How to Backup iPhone to External Hard Drive on Mac and Windows

If you want to backup iPhone to external hard drive, start with one rule: a full iPhone backup and a photo export are not the same thing.
A full backup lets you restore your iPhone later with apps, settings, messages, and device data. A photo or file export gives you readable files on a drive, but it will not rebuild your iPhone after loss, theft, or a bad update.
Apple does not give you a clean “save this iPhone backup to my external drive” button in Finder, iTunes, or the Apple Devices app. So you have 4 practical options:
This guide shows each method, when to use it, and what can go wrong if your external drive disappears at the wrong time.
- Use AltTunes on Windows to create and manage local iPhone backups with your own storage.
- Create a normal Apple backup on your computer, then copy the backup folder to an external drive.
- Redirect Apple’s backup folder to an external drive with a symlink on Mac or a junction on Windows.
- Export photos and videos directly to external storage when you only need media files.
Before we begin
Windows users should download AltTunes to create a local iPhone backup or export readable photos, videos, messages, contacts, and files before copying them to an external drive. Decide first whether you need a restorable device backup or normal files you can open independently.
How to Backup iPhone to External Hard Drive: Pick the Right Backup Type
Use this quick split before you touch any settings.
What you need | Best method | Can restore full iPhone later? | Best for |
|---|---|---|---|
Full device backup with settings, messages, app data, and device state | Finder, Apple Devices app, iTunes, or AltTunes backup | Yes | New iPhone setup, disaster recovery |
A portable archive of one completed backup | Copy the Apple backup folder to an external drive | Yes, if restored correctly | Freeing computer storage |
Future backups stored on the external drive | Symlink or Windows junction | Yes, but fragile | Advanced users with a drive always connected |
Photos, videos, and files you can browse | Export to external drive | No | Saving media, freeing iPhone storage |
If your goal is “I want my whole iPhone recoverable,” use a full backup. If your goal is “I want my photos on a USB drive,” export the photos. Mixing those up is how people end up with a drive full of files and no usable restore.
How to Backup iPhone to External Hard Drive on Windows with AltTunes
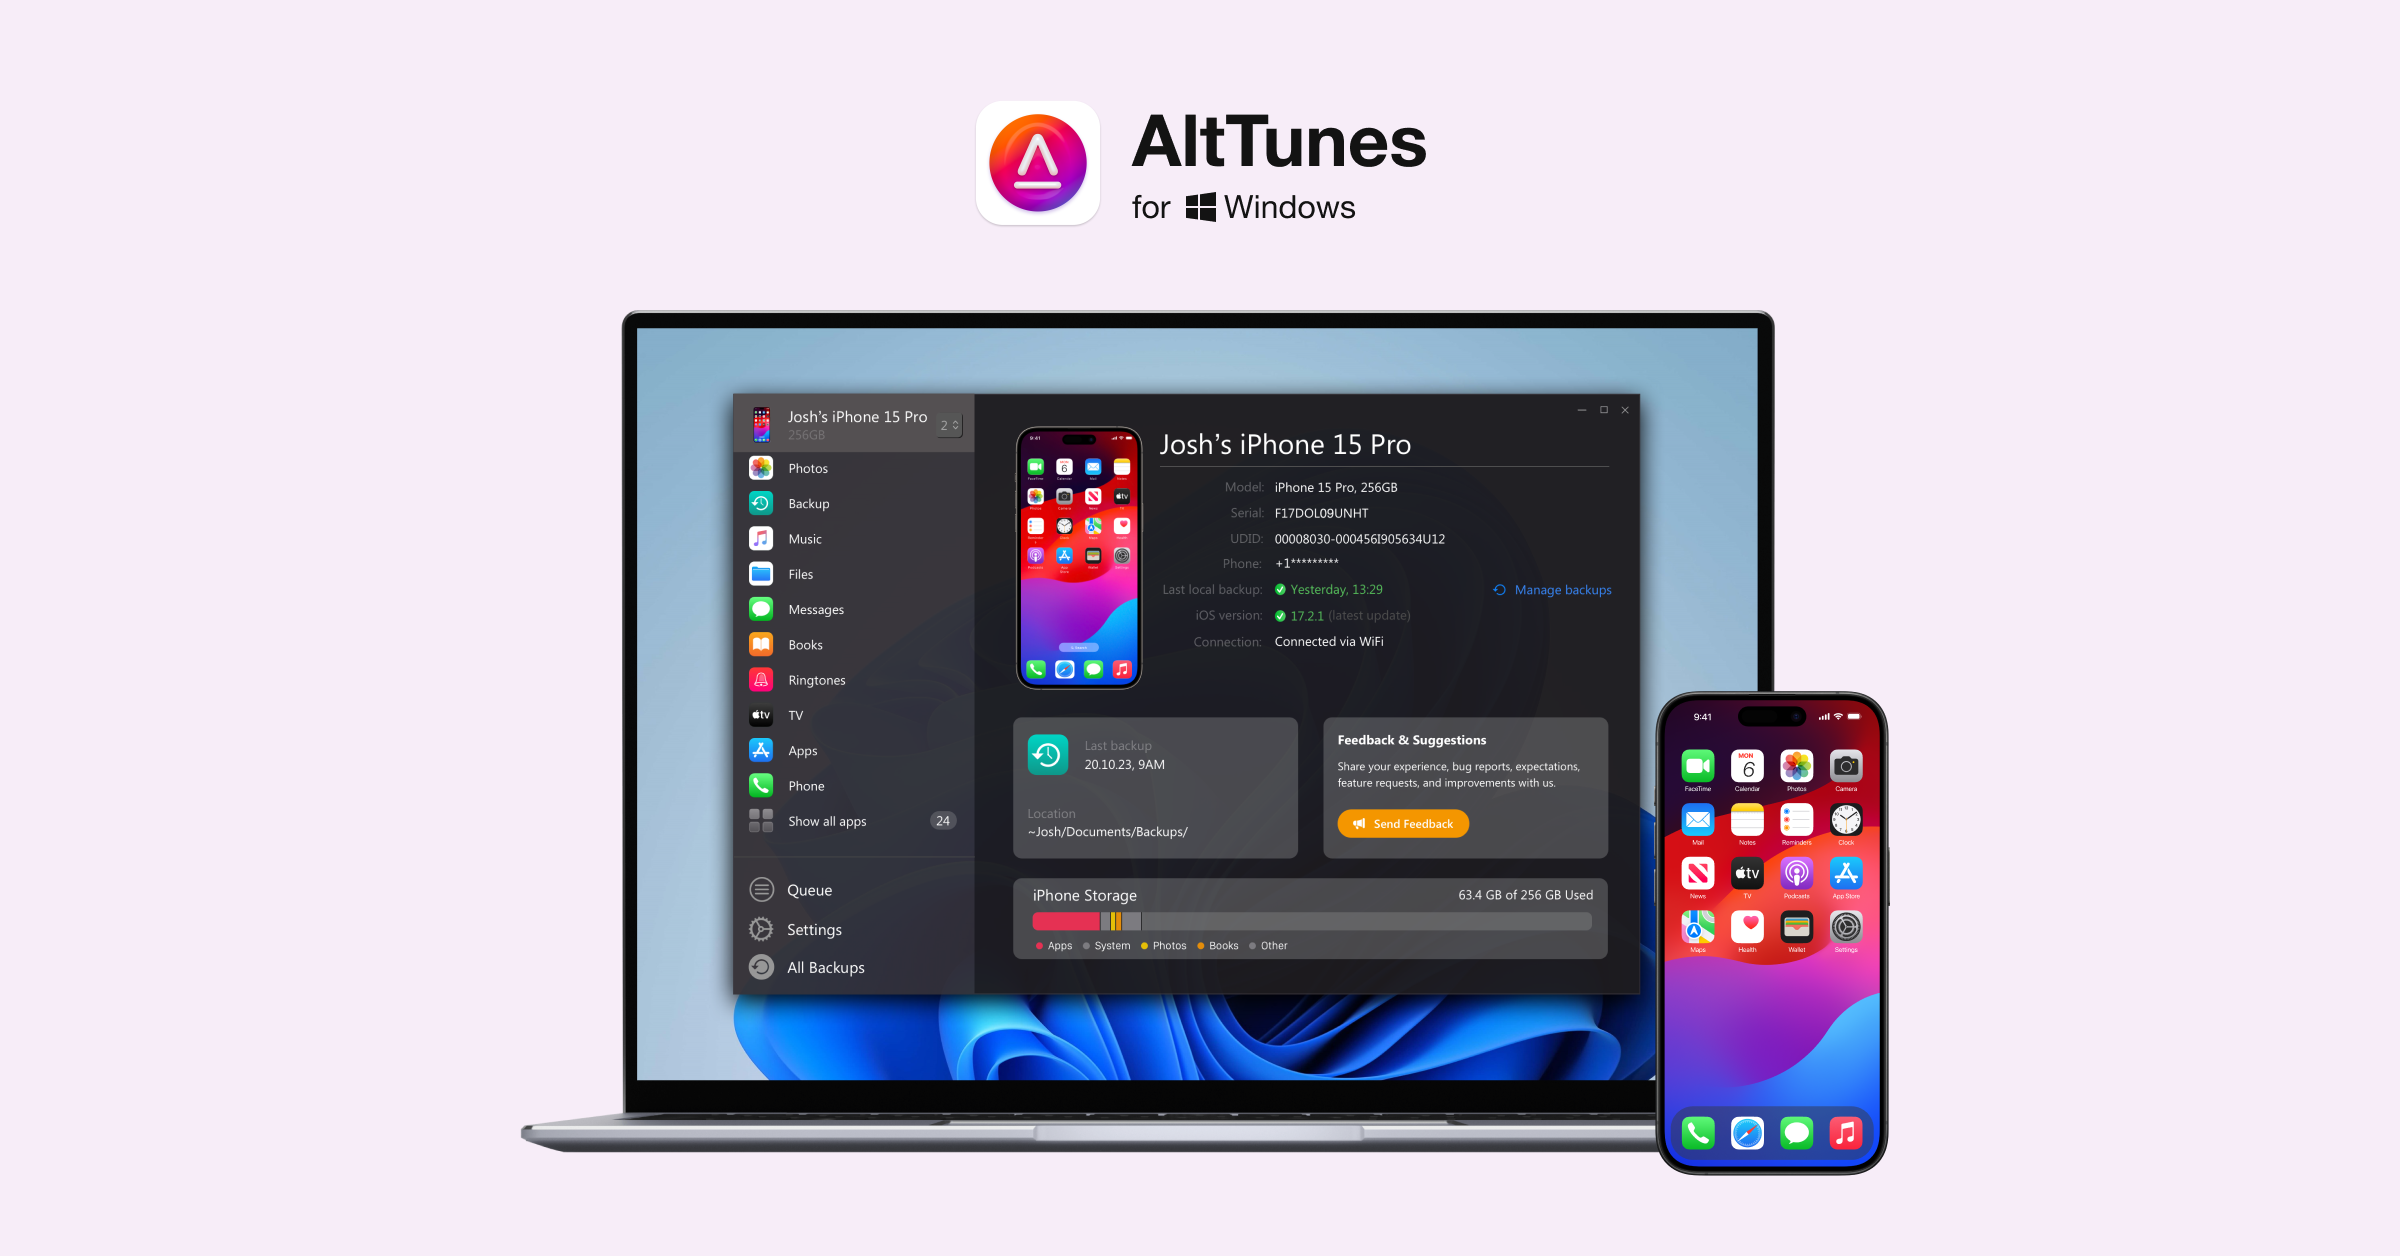
Windows users get the worst Apple experience. iTunes feels old, the Apple Devices app hides details, and neither makes external-drive backups feel obvious.
AltTunes is the simpler Windows path. It lets you back up and manage iPhone data locally, browse existing backups, export photos, videos, music, messages, contacts, and save files to your PC or external drive. It is Windows-only right now, so Mac users should skip to the Finder method below.
How to Backup iPhone to External Hard Drive with AltTunes
- Connect your iPhone to your Windows PC with a cable.
- Connect your external hard drive or SSD to the same PC.
- Open AltTunes.
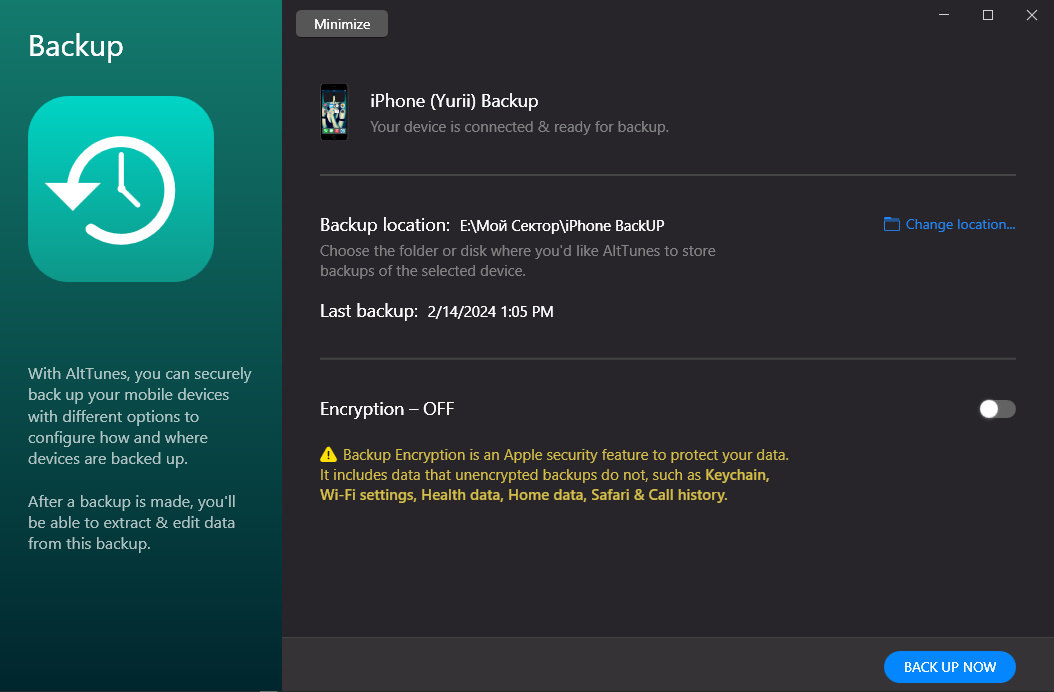
- Choose the iPhone backup option.
- Select your external hard drive or a folder on that drive as the backup location.
- Start the backup and keep both devices connected until it finishes.
- Open the backup in AltTunes after the run to confirm it exists and can be browsed.
Why AltTunes Fits This Job
AltTunes is useful when you want control without digging through hidden Apple folders.
For photo-heavy backups, use the AltTunes photo export workflow to save iPhone photos and videos to a folder on your PC or external drive. For full device recovery, use the AltTunes backup workflow and keep the backup folder intact.
- You can choose where iPhone data is stored.
- You can browse backups instead of treating them like mysterious folders.
- You can export readable files, including photos, videos, music, messages, contacts, notes, calendars, voice memos, and more.
- You can keep data local instead of sending everything to iCloud.
- You avoid the usual Windows iTunes mess.
Method 2: Backup iPhone to External Hard Drive with Finder, Apple Devices, or iTunes
Apple’s tools still matter because they create restorable iPhone backups. The problem is location. Finder on modern macOS, Apple Devices on Windows, and iTunes on older setups save backups to the computer first.
The safe workflow is simple:
Do not pick random files inside the backup folder. Keep the whole folder structure together.
- Create a normal local backup.
- Find the backup folder.
- Copy the full backup folder to your external hard drive.
- Keep the original until you confirm the copy exists.
Step 1: Connect Your iPhone and External Drive
- Connect your iPhone to your Mac or Windows PC.
- Connect your external hard drive, SSD, or USB drive.
- Make sure the computer can read the drive.
- Use a stable cable. A failed cable turns a backup into a bad afternoon.
Step 2: Create a Local iPhone Backup First
On Mac with macOS Catalina or later:
On Windows 10 or Windows 11:
Apple’s Windows backup guide confirms that encrypted local backups are required for Health and Activity data, and that the password cannot be recovered if you forget it. Save the password somewhere sane.
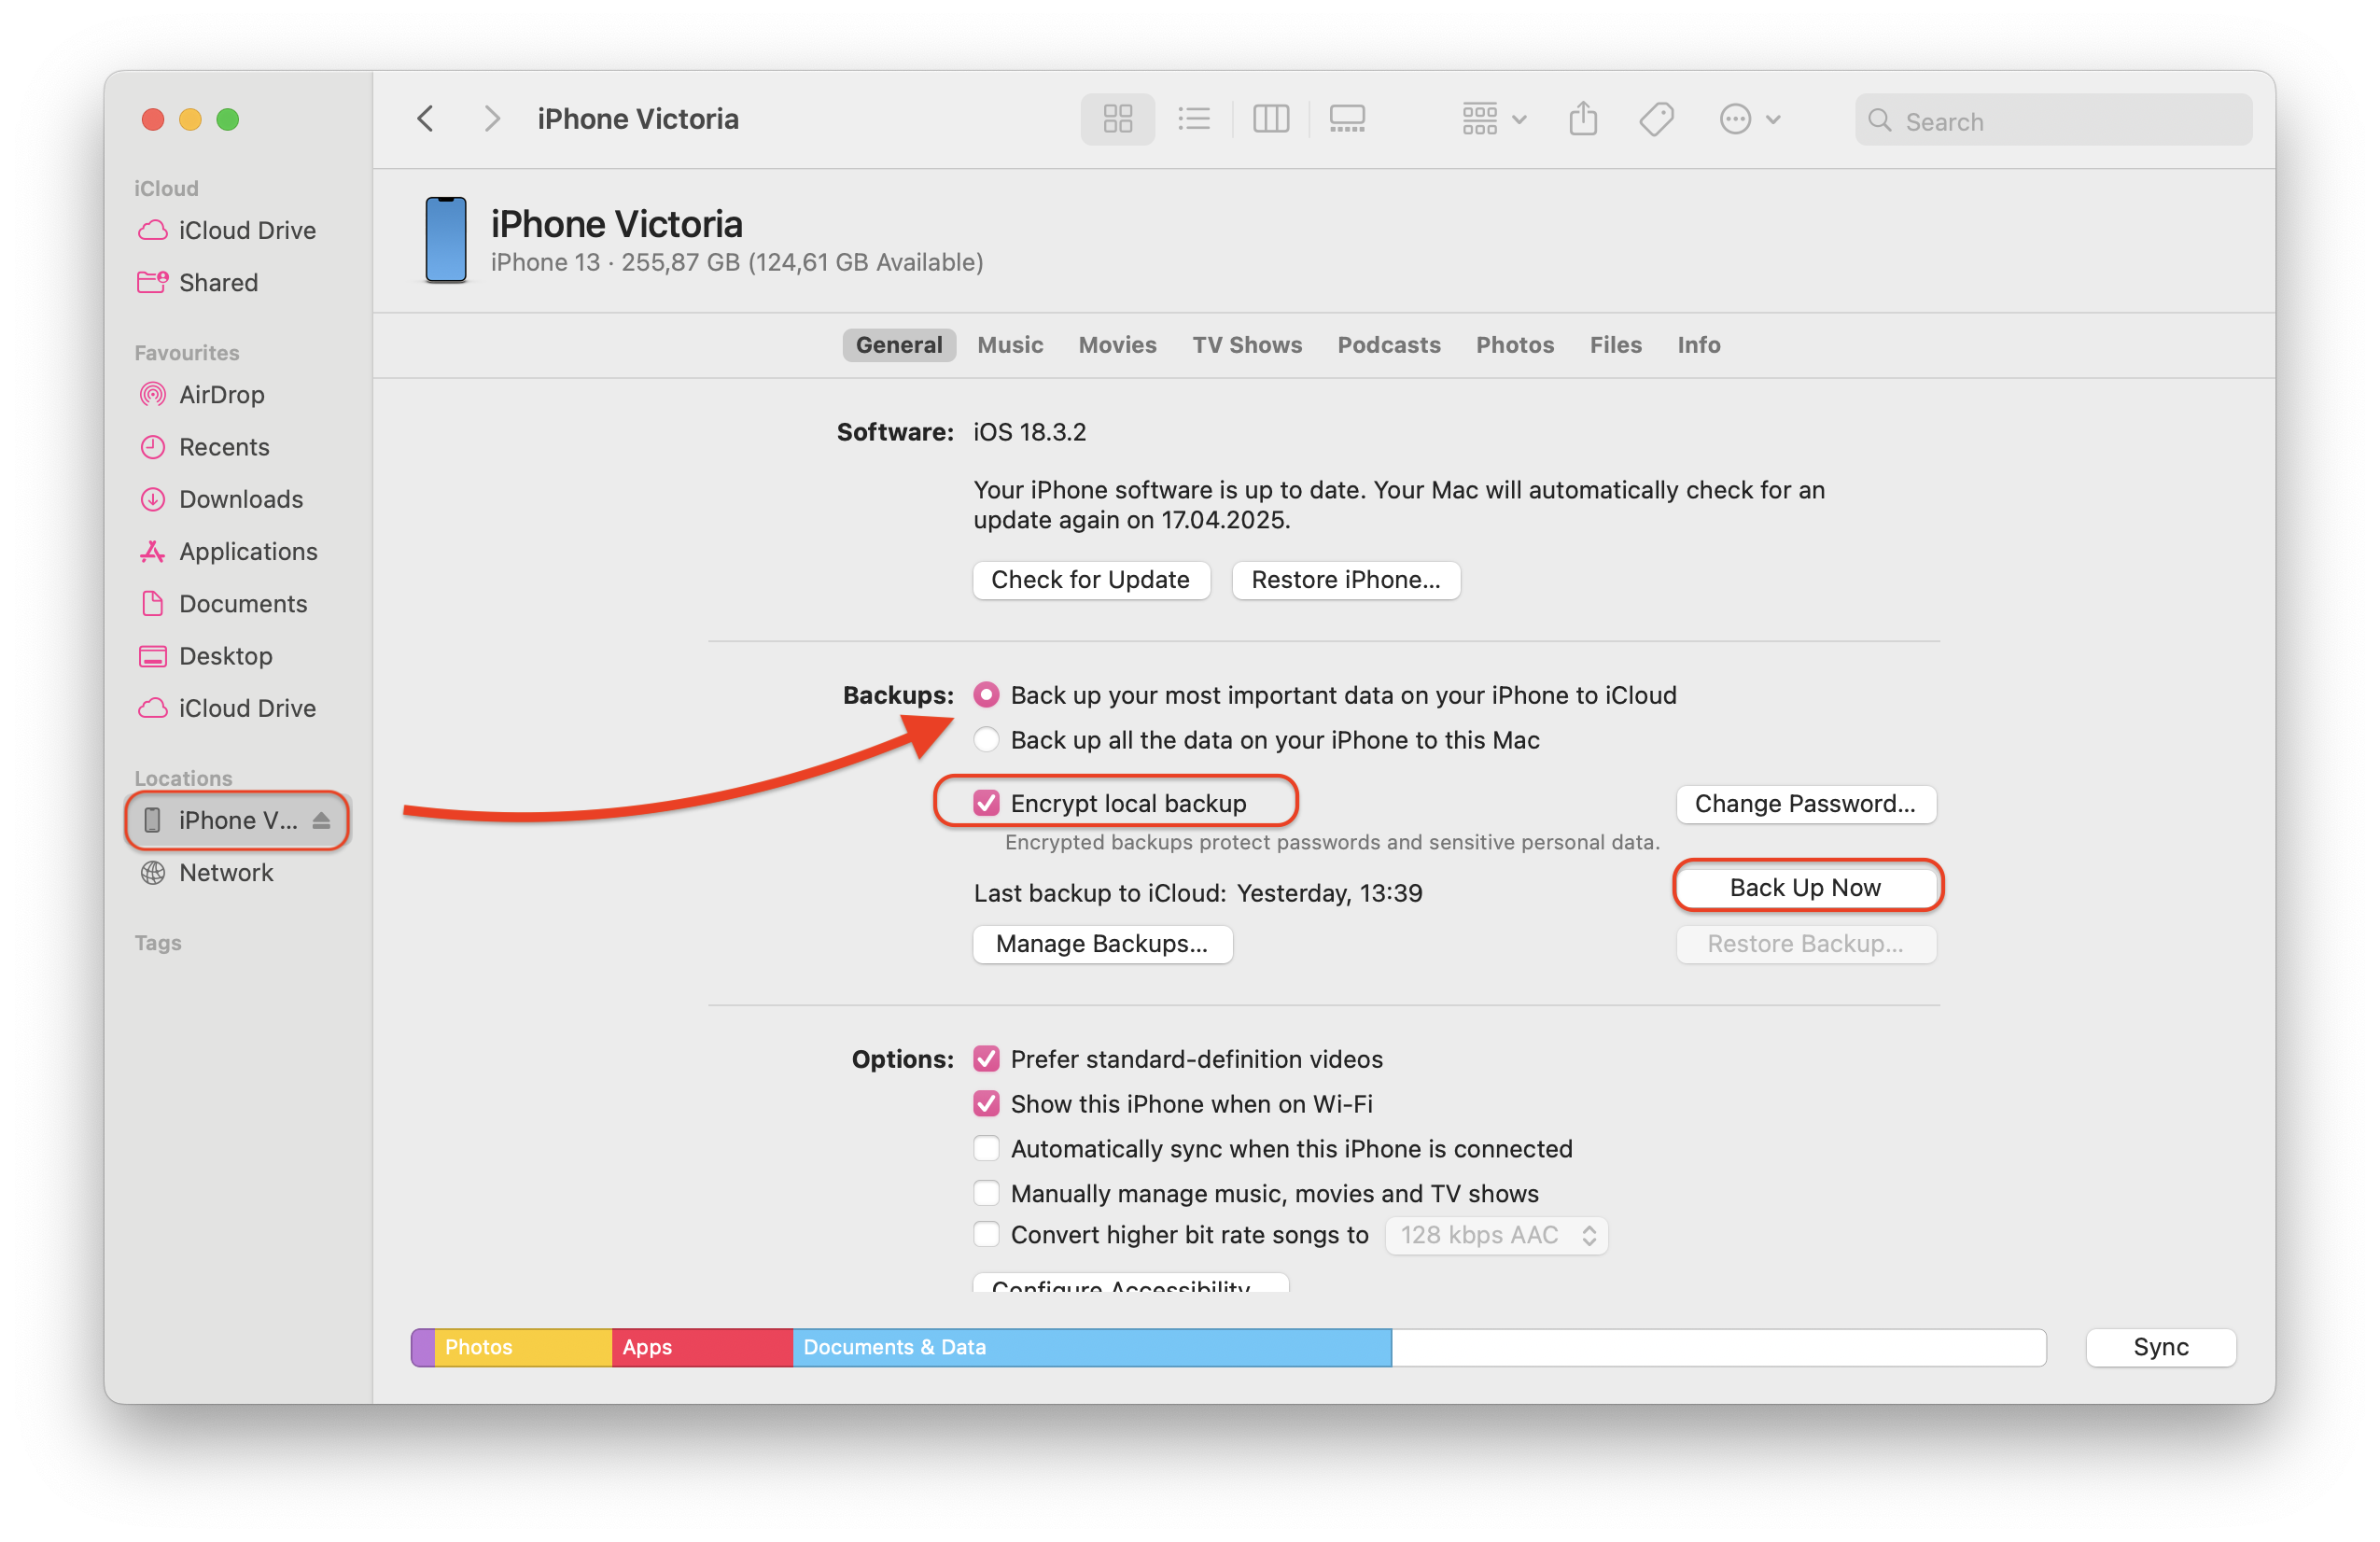
- Open Finder.
- Select your iPhone in the sidebar.
- Open the General tab.
- Choose “Back up all of the data on your iPhone to this Mac.”
- Turn on encrypted backup if you need Health, Activity, saved passwords, Wi-Fi settings, and other sensitive data included.
- Click Back Up Now.
- Open the Apple Devices app. If you do not have it, use iTunes.
- Select your iPhone.
- Open General or Summary.
- Choose local computer backup.
- Turn on encrypted local backup if you need Health, Activity, and sensitive data included.
- Click Back Up Now.
Step 3: Find the iPhone Backup Folder
On Mac, open Finder, click Go > Go to Folder, and paste:
~/Library/Application Support/MobileSync/Backup/
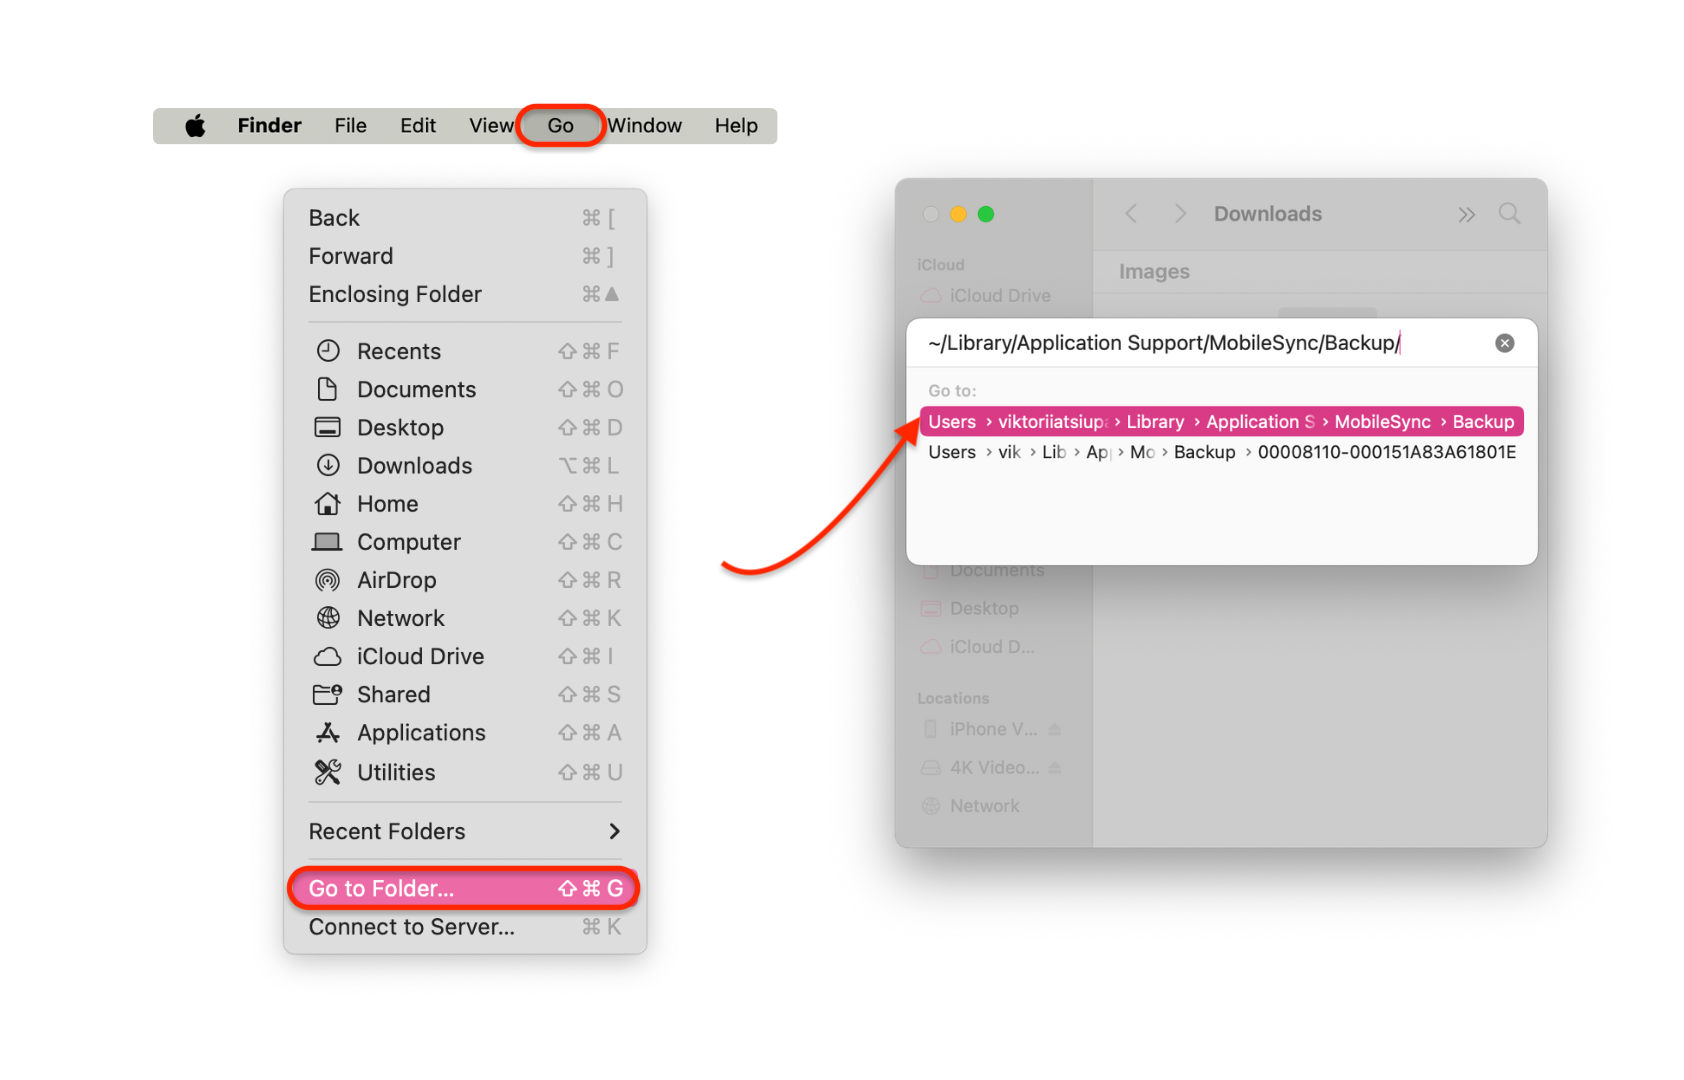
On Windows with iTunes, open File Explorer and paste:
C:\Users\[Your Username]\AppData\Roaming\Apple Computer\MobileSync\Backup\
If you installed iTunes from the Microsoft Store, check:
C:\Users\[Your Username]\Apple\MobileSync\Backup\
Windows hides AppData by default. In File Explorer, turn on View > Show > Hidden items if you need to browse manually.
Keep the whole backup folder together. Do not rename random internal files, delete “duplicate-looking” folders, or split one backup across drives.
Step 4: Copy the Backup to Your External Hard Drive
This gives you a portable archive. If you need to restore later, copy the backup folder back into the Apple backup location first, then use Finder, Apple Devices, or iTunes to restore it.
- Create a folder on the external drive named something clear, like iPhone Backups.
- Copy the newest backup folder into it.
- Wait for the copy to finish.
- Compare folder size on the computer and external drive.
- Keep the original local backup until you are sure the external copy is complete.
Method 3: Automatically Backup iPhone to External Hard Drive
You can force future Apple backups to land on an external drive by redirecting the MobileSync backup folder. On Mac, that means a symlink. On Windows, it means a junction link.
This method works only if the external drive is connected when you back up. If the drive is missing, renamed, sleeping, or disconnected, Finder, Apple Devices, or iTunes may fail.
Use this only if you are comfortable undoing it later.
On Mac: Use a Symlink
Example command:
ln -s /Volumes/[External Drive Name]/Backup ~/Library/Application\ Support/MobileSync/Backup
- Close Finder backup windows and unplug your iPhone.
- Go to ~/Library/Application Support/MobileSync/.
- Move the Backup folder to your external drive.
- Open Terminal.
- Create a symlink from the original location to the external-drive folder.
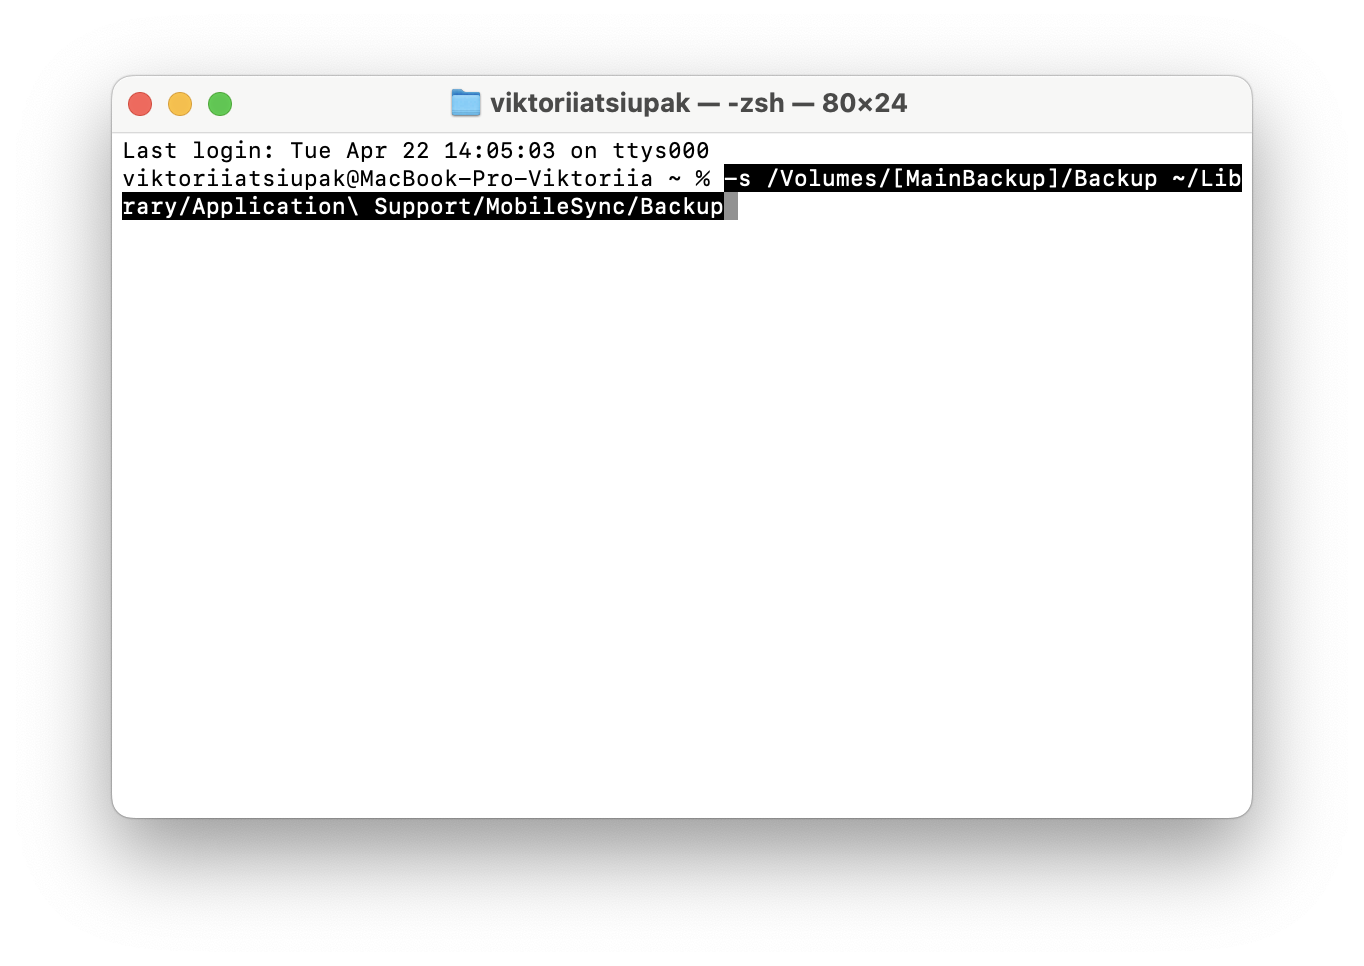
After that, Finder still looks in the normal MobileSync location, but macOS points it to the external drive.
On Windows: Use a Junction Link
For the classic iTunes path, use:
mklink /J "C:\Users\[Your Username]\AppData\Roaming\Apple Computer\MobileSync\Backup" "[External Drive Letter]:\Backup"
For the Microsoft Store iTunes path, adjust the first path to:
C:\Users\[Your Username]\Apple\MobileSync\Backup
After that, iTunes or Apple Devices saves future backups through the junction.
- Close iTunes or the Apple Devices app.
- Move the Backup folder from MobileSync to your external drive.
- Open Command Prompt as Administrator.
- Create a junction from the old location to the external-drive folder.
How to Undo the Symlink or Junction
On Mac:
rm ~/Library/Application\ Support/MobileSync/Backup
~/Library/Application Support/MobileSync/Backup/
On Windows:
rmdir "C:\Users\[Your Username]\AppData\Roaming\Apple Computer\MobileSync\Backup"
Do not use these commands if you are unsure which folder is the real backup and which one is the link. Copy the backup to a separate safe folder first.
- Open Terminal.
- Remove the symlink:
- Move the real Backup folder back to:
- Open Command Prompt as Administrator.
- Remove the junction:
- Move the real Backup folder back into the MobileSync folder.
Method 4: Transfer iPhone Photos and Videos to External Hard Drive
Sometimes you do not need a full iPhone restore. You need 8,000 photos off your phone before the storage warning ruins your day again.
For that, export media instead of making a full backup.
Option A: Export Photos on Windows with AltTunes
AltTunes can export photos and videos from iPhone to a Windows PC or external drive. This gives you normal files you can browse, copy, upload, or archive.
This is not a full iPhone backup. It is better when you want readable photo and video files outside Apple’s backup system.
- Connect your iPhone to your Windows PC.
- Connect the external hard drive.
- Open AltTunes.
- Choose Photos.
- Select the albums, photos, or videos you want.
- Export them to a folder on the external drive.
Option B: Use Direct USB-C External Storage on iPhone
Newer iPhones with USB-C can use external storage through the Files app and supported apps. Apple says external drives must have one data partition and use a supported format such as APFS, APFS encrypted, Mac OS Extended, exFAT, FAT32, or FAT.
Some external hard drives need extra power. If the iPhone cannot power the drive, use a powered USB hub. Lightning iPhones may need Apple’s Lightning to USB 3 Camera Adapter with power.
Direct external storage is useful for files and media. It does not create a full restorable iPhone backup.
External Drive Checklist Before You Start
Before you backup iPhone to external hard drive, check the boring parts. They matter.
- Capacity: The drive should have more free space than your iPhone’s used storage. Backups can be large.
- Format: Use a format your Mac, Windows PC, and iPhone can read. exFAT is common for cross-platform drives.
- Power: Portable SSDs are easier. Spinning hard drives often need more power.
- Cable: Use a reliable USB-C or Lightning cable. Cheap adapters fail at the worst moment.
- Name stability: Do not rename the drive if you use a symlink or junction.
- Encryption: Encrypt the iPhone backup if you need Health, Activity, Wi-Fi settings, saved passwords, or keychain-style data.
- Password storage: If you forget an encrypted backup password, Apple cannot recover it for you.
Common Mistakes to Avoid
Mistake 1: Treating Photo Export Like a Full Backup
A folder of photos is useful. It is not a restorable iPhone backup. If your iPhone dies, Finder cannot restore your messages, settings, app data, and device state from a random photo folder.
Mistake 2: Deleting the Local Backup Too Soon
Copy first. Verify second. Delete later.
If you remove the local backup before the external copy finishes, you may end up with nothing usable.
Mistake 3: Backing Up to a Drive You Rarely Connect
Symlinks and junctions are picky. If the external drive is not connected, Apple’s backup tool may fail because the destination path is gone.
Mistake 4: Forgetting Encrypted Backup
Unencrypted computer backups leave out some sensitive data. If you expect a complete restore, turn on encrypted local backup and save the password.
Mistake 5: Moving Pieces of the Backup Folder
Apple backups are folder structures, not single neat files. Move the whole backup folder. Do not “clean it up.”
Best Method by Situation
If you also need to move music, videos, PDFs, or other files back onto the iPhone later, WALTR PRO handles the reverse direction without iTunes. For the full Softorino iPhone toolbox, the Universal License covers the core apps in one subscription.
- Best for Windows users: Use AltTunes for Windows if you want simpler local iPhone backup and export control.
- Best for Mac users: Use Finder to create an encrypted local backup, then copy the full backup folder to the external drive.
- Best for recurring external backups: Use a symlink or junction only if the drive stays connected.
- Best for photos and videos: Export media to a normal folder on the external drive.
- Best for full disaster recovery: Keep at least one encrypted local backup and one external copy.
How to Disable Automatic Sync After Using an External Drive
Your external drive will not always be plugged in. If you use a symlink or junction, disable automatic sync so Apple’s tools do not try to back up or sync when the drive is missing.
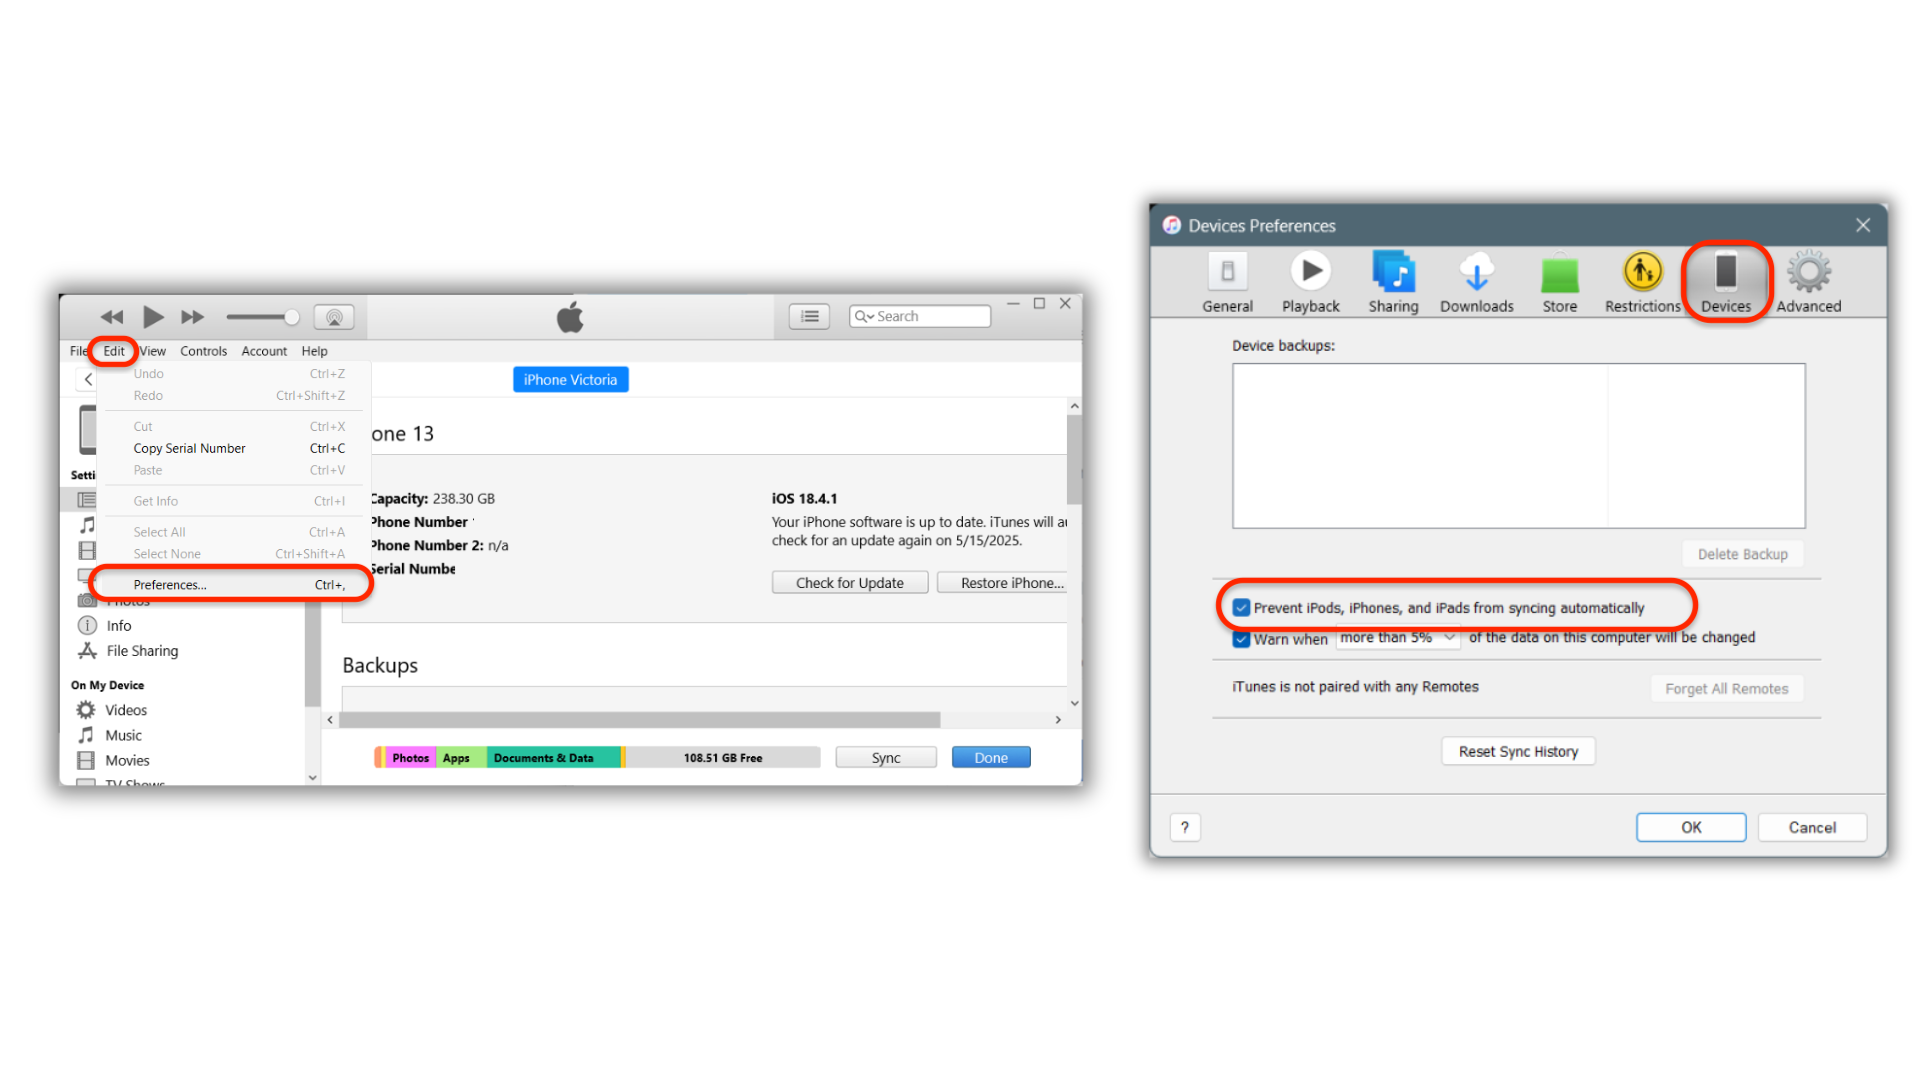
For iTunes:
- Open iTunes.
- Go to Edit > Preferences > Devices.
- Check “Prevent iPods, iPhones, and iPads from syncing automatically.”
For Finder:
- Select your iPhone in Finder.
- Open the General tab.
- Uncheck “Automatically sync when this iPhone is connected.”
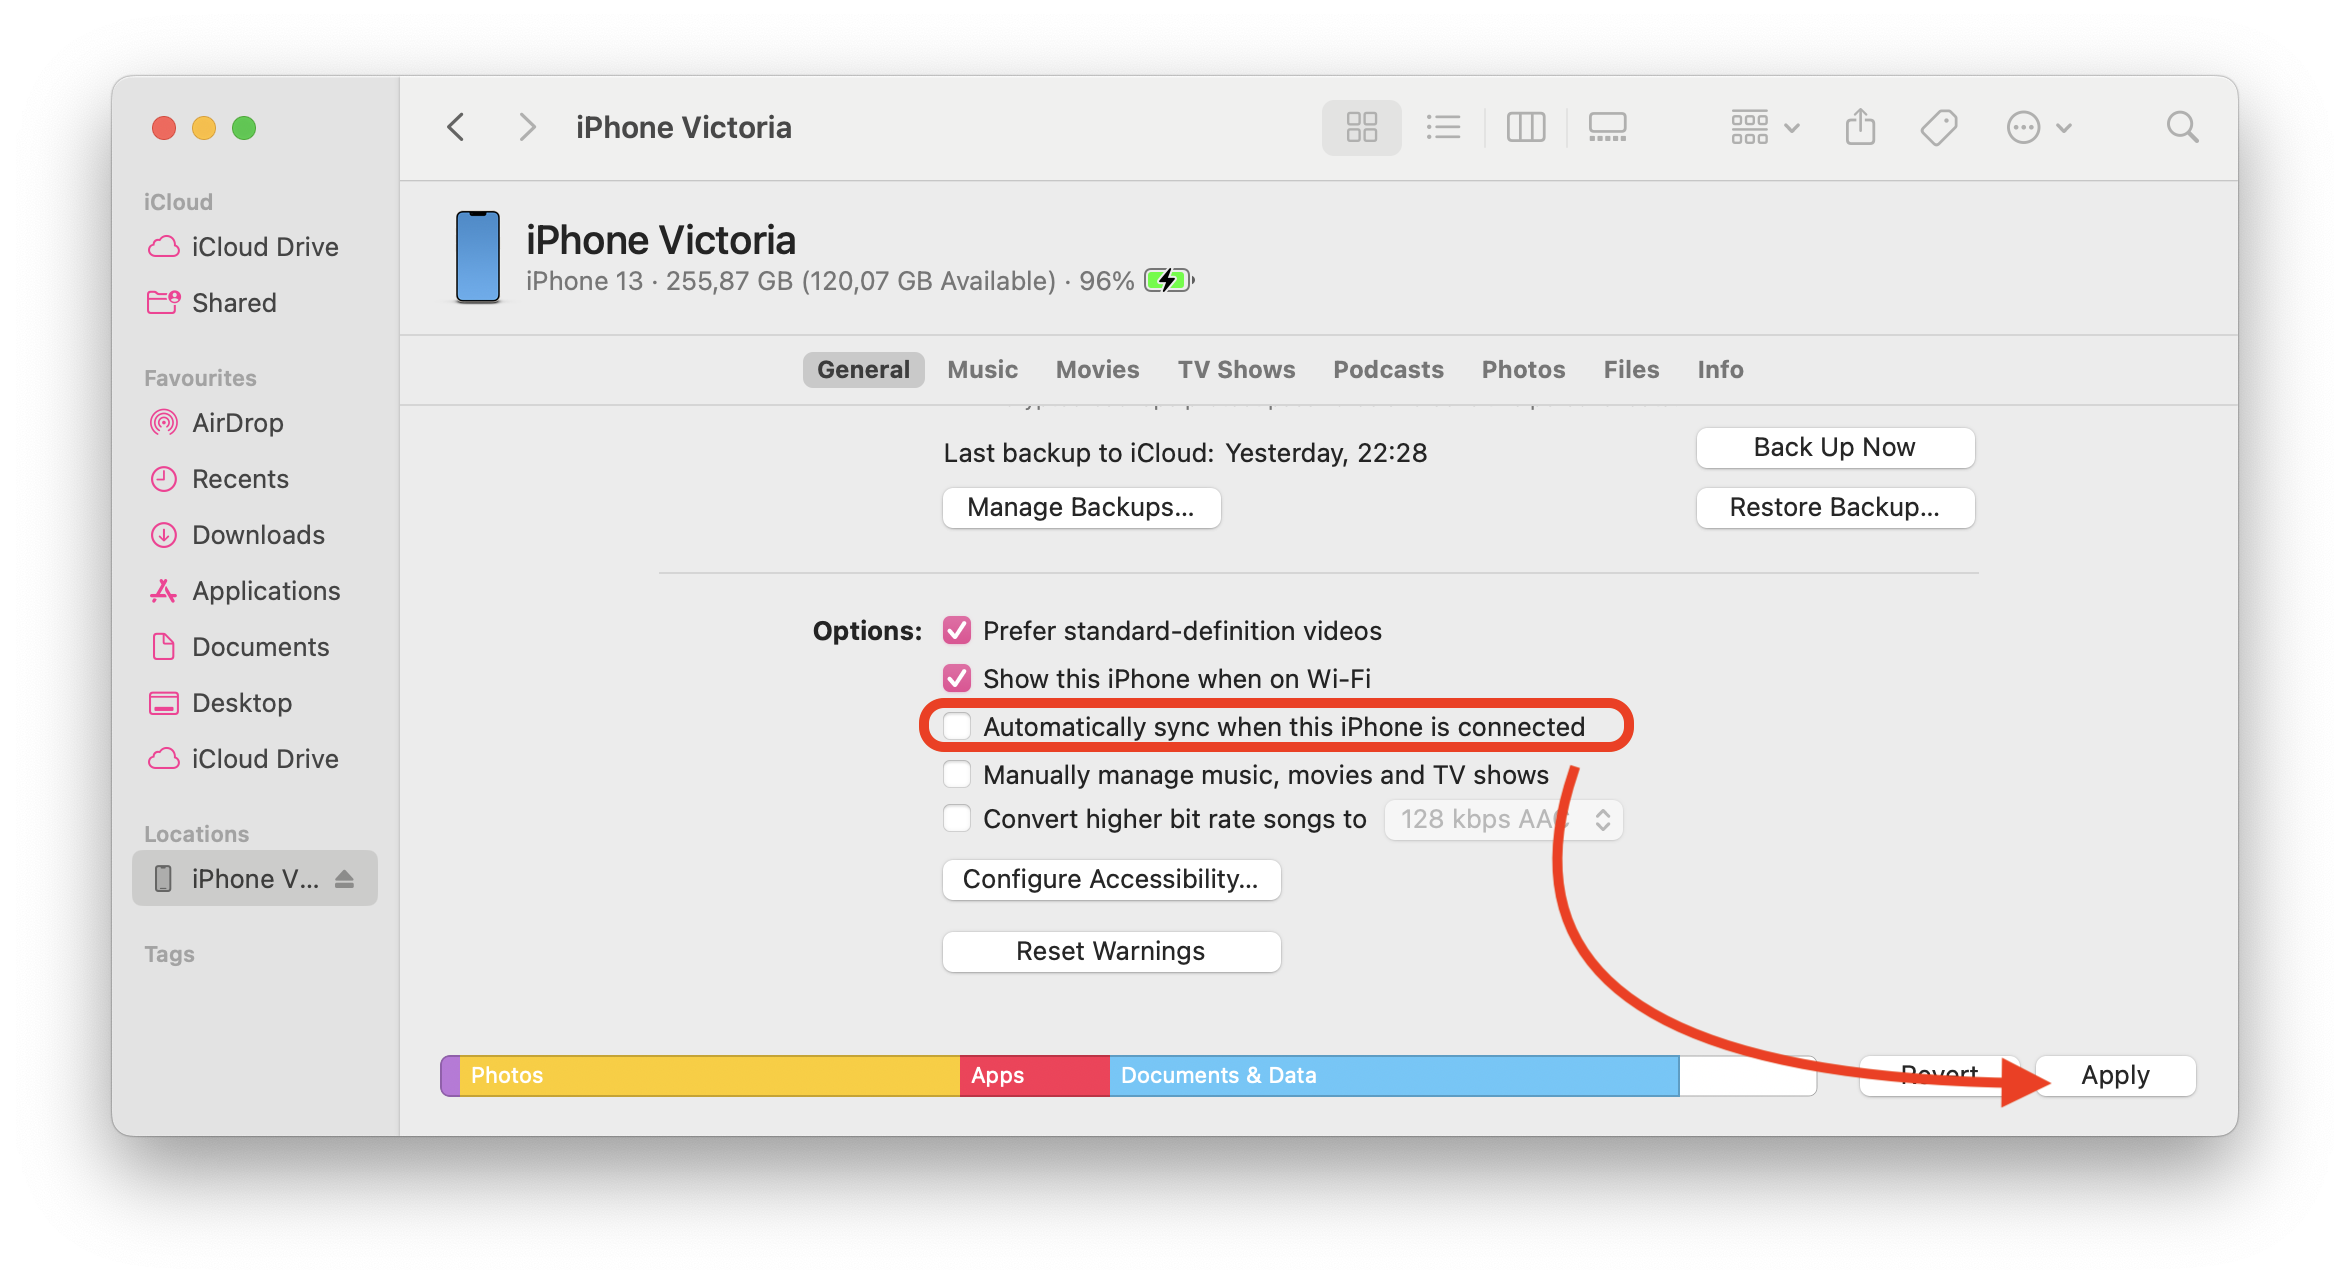
This does not disable manual backups. It stops surprise sync attempts when your setup is not ready.
Bottom Line
The safest way to backup iPhone to external hard drive is to create a proper full backup first, then store a verified copy on the external drive.
On Windows, AltTunes gives you the cleanest Softorino path because it lets you manage iPhone backups and exports without fighting iTunes. On Mac, Finder plus a copied backup folder is the safest default. Symlinks and junctions work, but only if you understand the risk and keep the drive connected.
For photos and videos, export files directly. For full iPhone recovery, keep the backup folder intact.
FAQ
Can I back up my iPhone directly to an external hard drive?
Not with a simple built-in Apple button. Finder, Apple Devices, and iTunes create local computer backups first. You can then copy the backup folder to an external hard drive, redirect the backup folder with a symlink or junction, or use a third-party Windows tool such as AltTunes to manage local backups and exports.
Is exporting photos to an external drive the same as a full iPhone backup?
No. A photo export gives you readable photos and videos. A full iPhone backup stores device data for restore, including settings, messages, app data, and more. Use both if you care about readable media and full recovery.
Should I encrypt my iPhone backup?
Yes, if you want the most complete local backup. Apple says Health and Activity data require encrypted backups. Encrypted backups can also include sensitive data that unencrypted backups leave out. Save the password because Apple cannot recover it for you.
Can I restore an iPhone from a backup copied to an external drive?
Yes, if the backup folder is complete and you put it back where Finder, Apple Devices, or iTunes expects to find backups. Do not restore from a half-copied folder or from loose files pulled out of the backup.
Can I use a USB-C drive directly with iPhone?
Yes, for files and media through the Files app and supported apps. Apple says the drive must use one data partition and a supported format such as APFS, APFS encrypted, Mac OS Extended, exFAT, FAT32, or FAT. Some drives need extra power. This does not create a full restorable iPhone backup.
What happens if my external drive is disconnected during automatic backup?
Finder, Apple Devices, or iTunes may fail because the redirected backup path is missing. If you use a symlink or junction, keep the drive connected before starting a backup and avoid automatic sync.
What is the best external drive format for iPhone backups?
For a drive shared between Mac and Windows, exFAT is usually the practical choice. For a Mac-only encrypted archive, APFS encrypted can work well. For direct iPhone external storage, Apple lists APFS, APFS encrypted, Mac OS Extended, exFAT, FAT32, and FAT as supported formats.

AltTunes
Seamlessly Browse, Manage & Export iOS Data
