How to Screen Record on iPhone: Setup, Tips & Troubleshooting


Ever needed to capture what's happening on your iPhone screen? Whether you're creating a tutorial for a confused relative, saving a fleeting social media moment, or documenting a software glitch, iPhone's screen recording feature makes it simple. This powerful built-in tool transforms your everyday interactions with your device into shareable video content with just a few taps.
What is Screen Recording?
Screen recording captures everything happening on your iPhone screen as a video. This built-in iOS feature lets you record actions, interactions, and content on your device without needing extra hardware or apps. Whether you want to show someone how to complete a task, save a social media story, or record gameplay, screen recording creates a video file of whatever appears on your screen.

How to Screen Record on iPhone and iPad
Screen recording on iPhone or iPad is straightforward. Here's how to set it up:
Step 1: Add Screen Recording to Control Center
Before you can start recording, make sure the Screen Recording feature is added to your Control Center:
- Open Control Center by swiping down from the top-right corner of the screen.
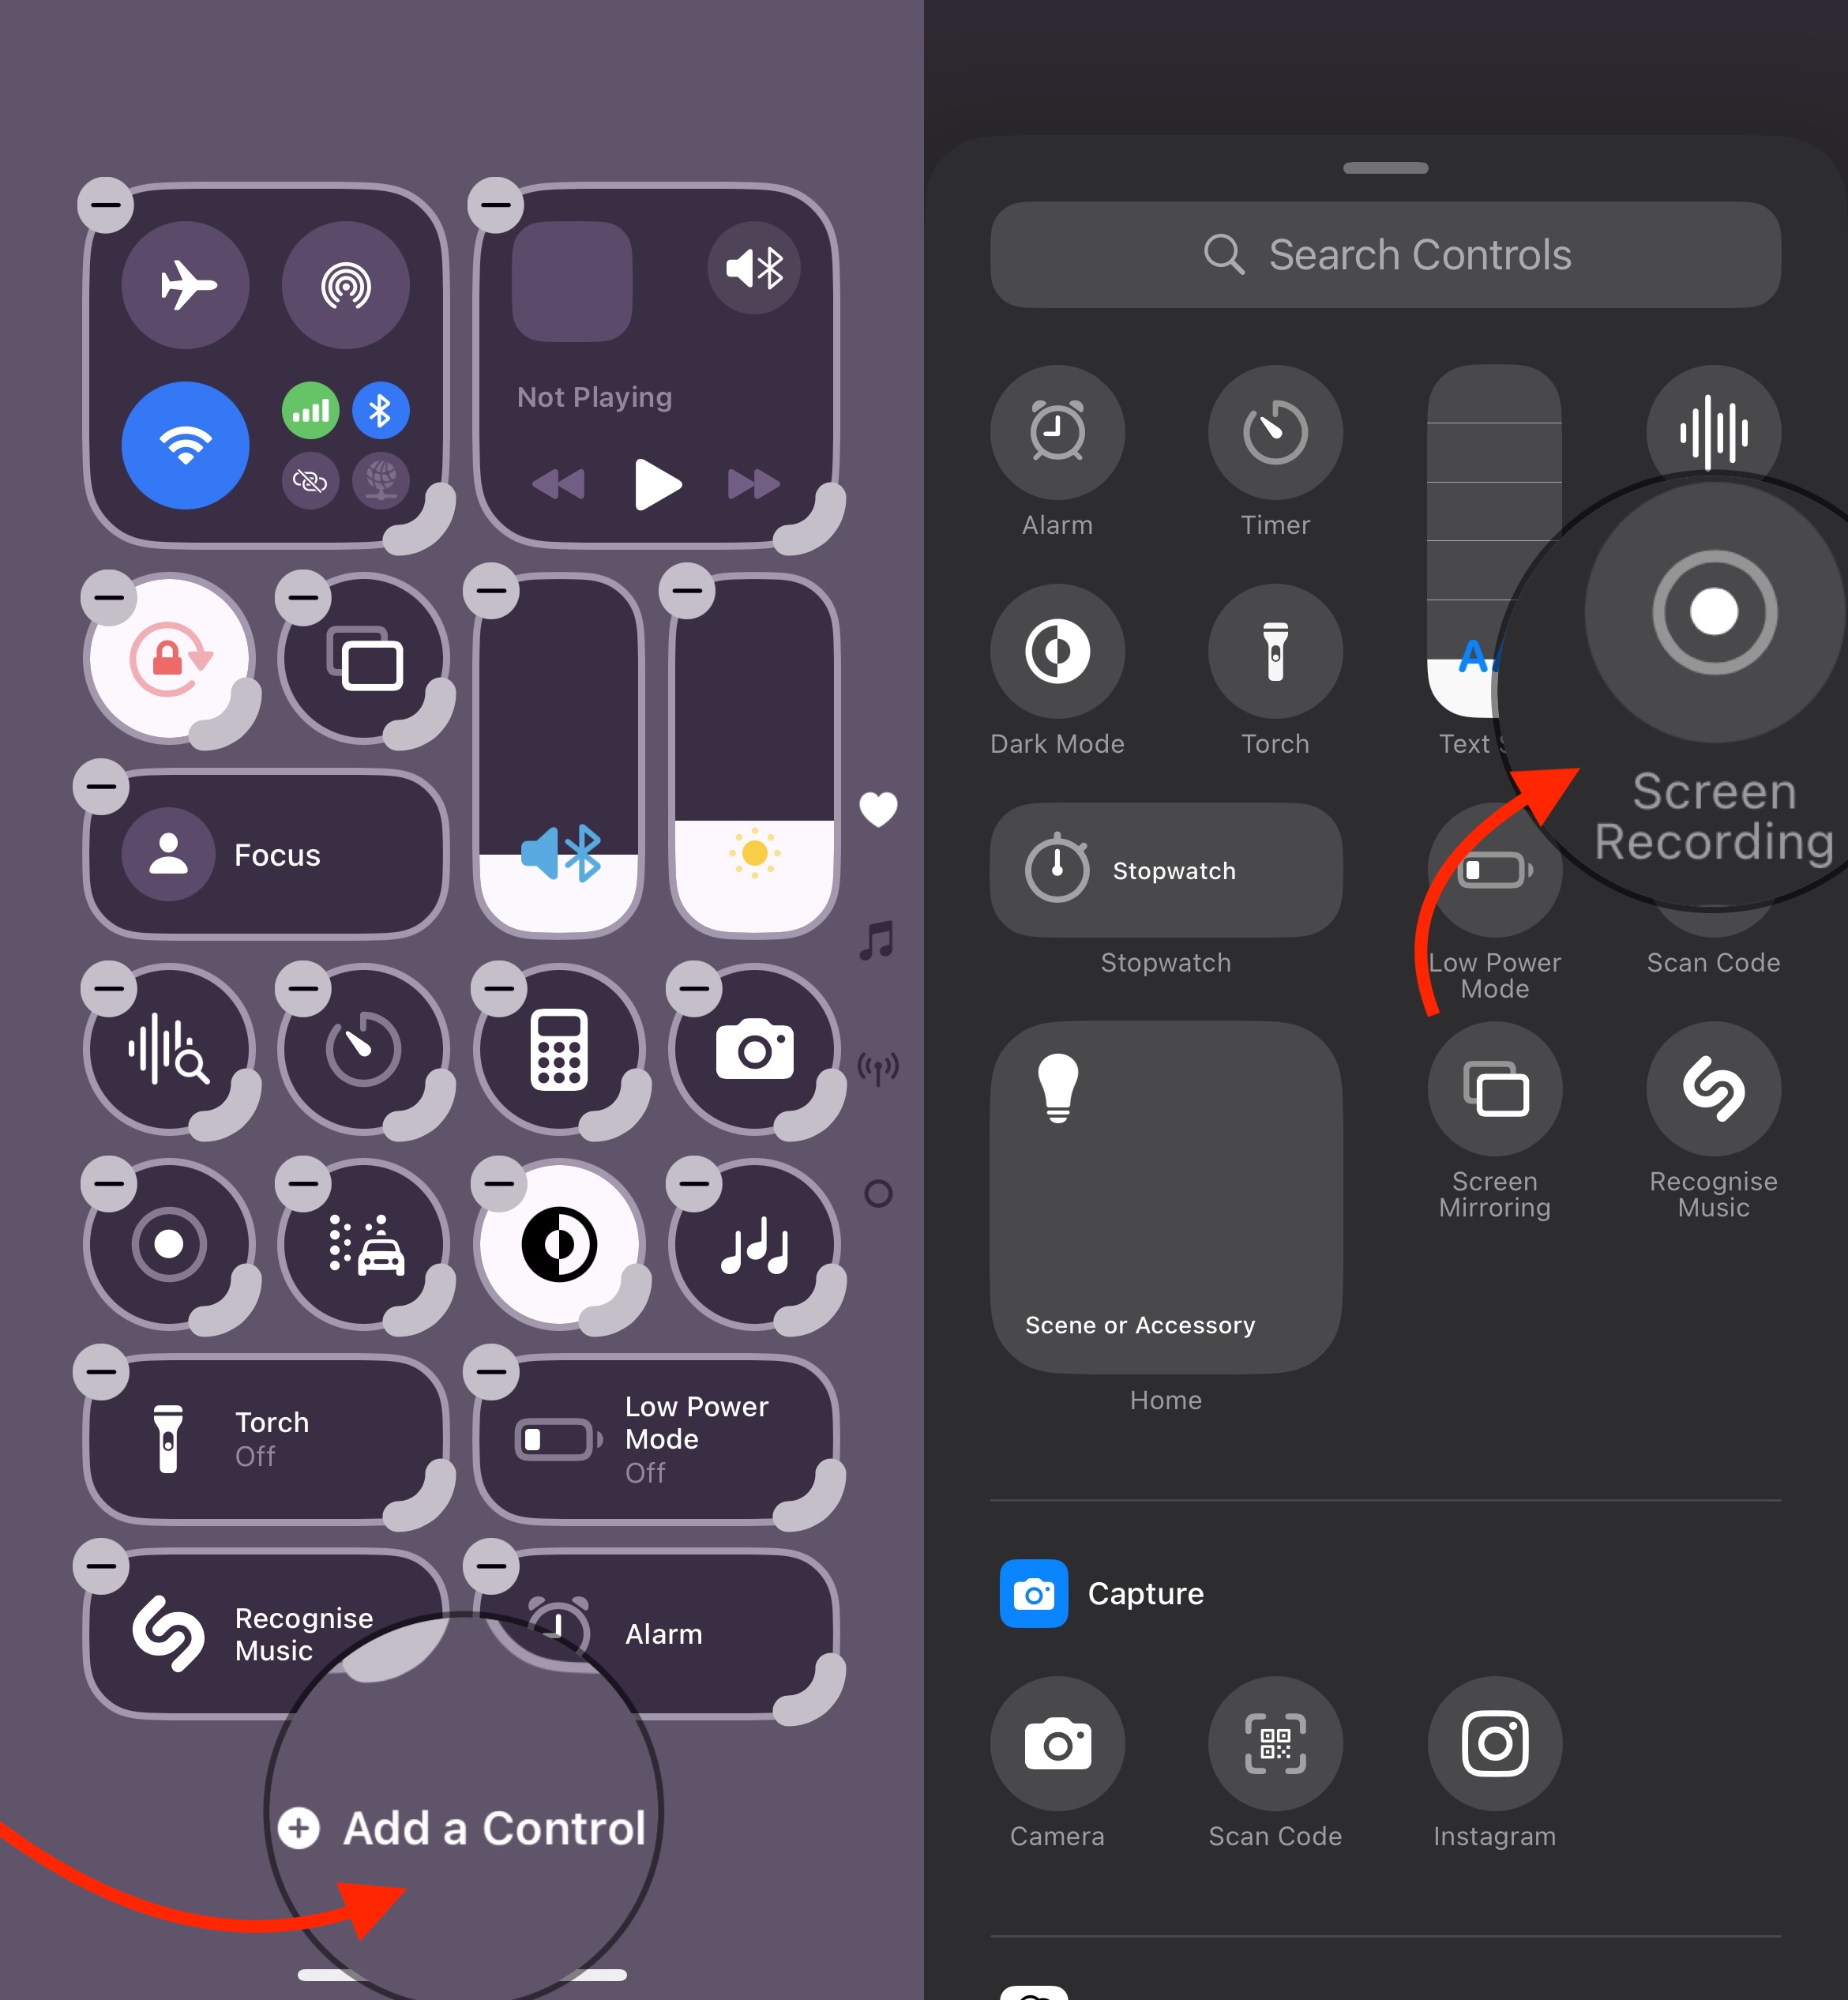
- Touch and hold the background of Control Center, then tap Add a Control.
- In the controls gallery, tap the Screen Recording button to add it to Control Center.
- Once added, tap anywhere on the screen to return to Control Center.

You only need to do this once. After adding, the Screen Recording button will remain in Control Center for future recordings.
Step 2: Start Recording
Once Screen Recording is in Control Center, follow these steps to begin your recording:
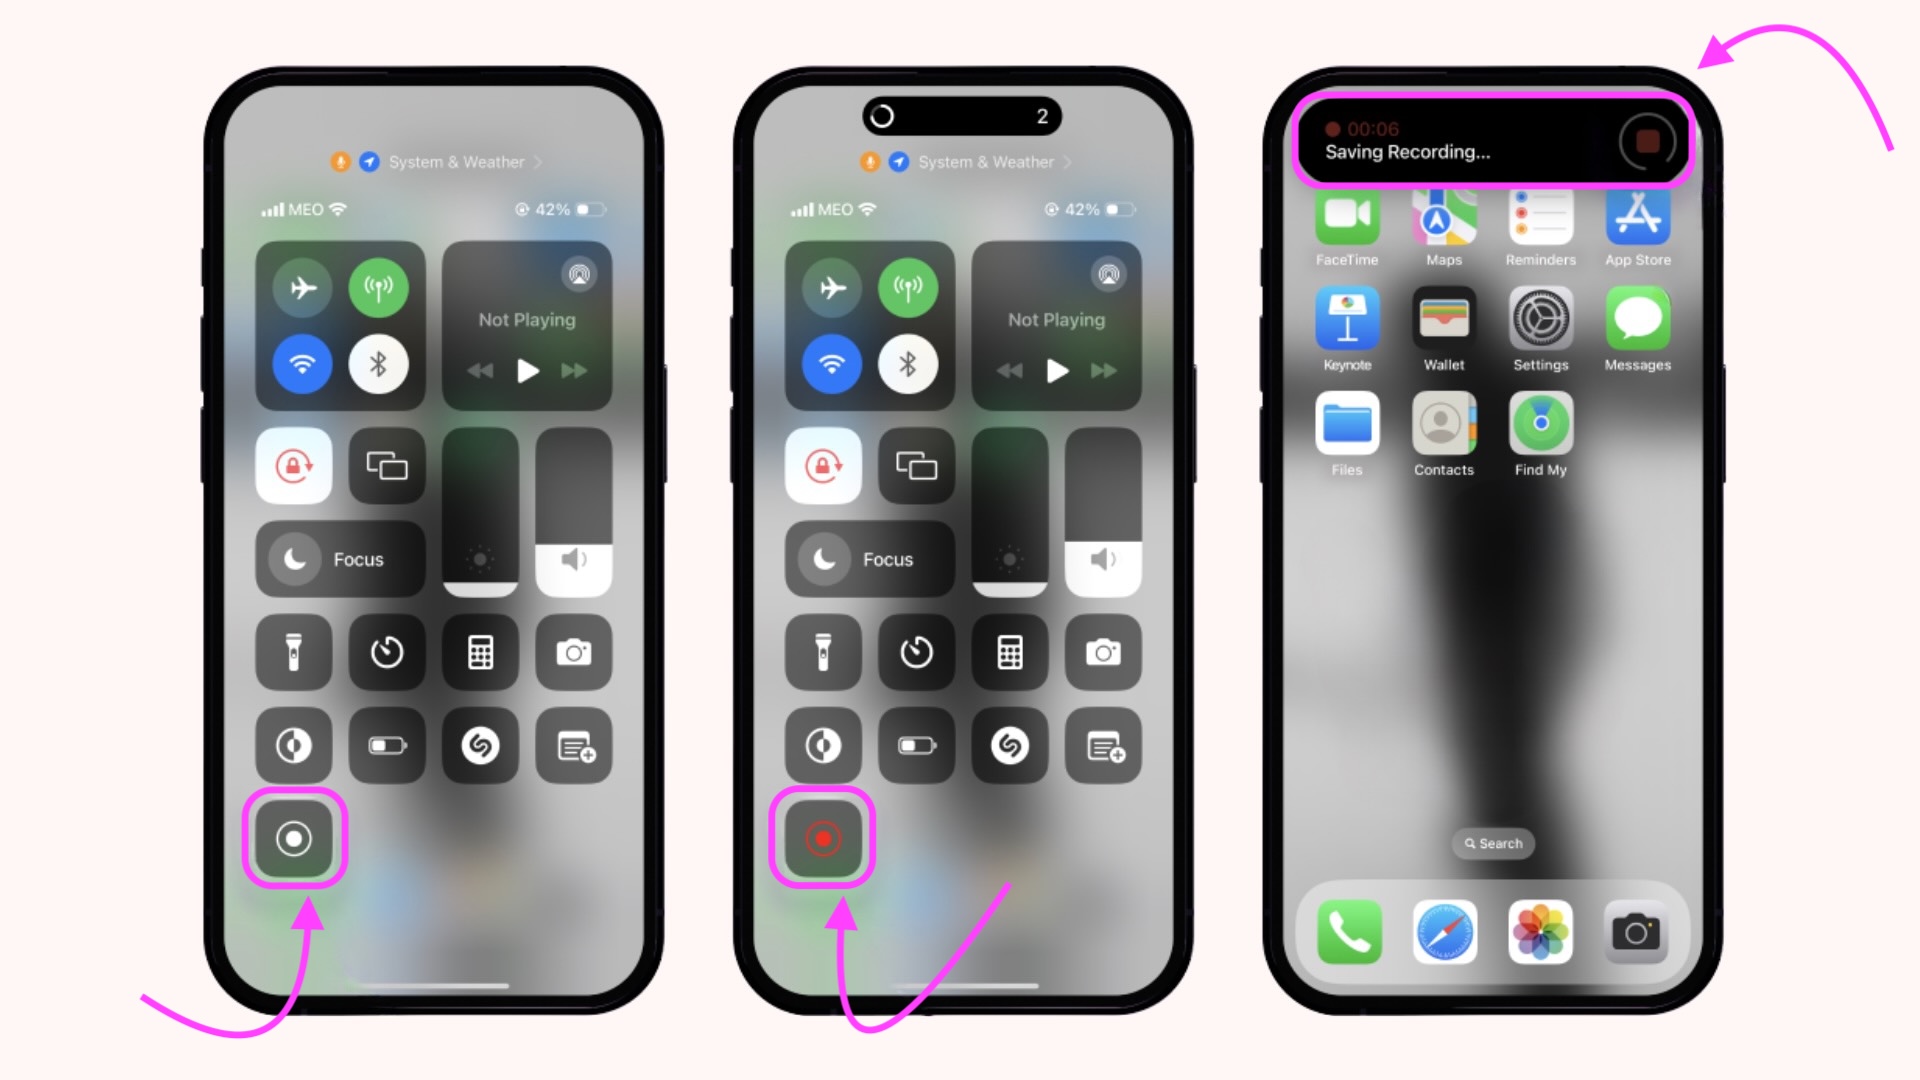
- Open Control Center: On iPhones with Face ID: Swipe down from the top-right corner of your screen. On iPhones with Touch ID: Swipe up from the bottom of the screen.
- Tap the Screen Recording icon: It looks like a circle within a circle.
- Wait for the countdown: After a 3-second countdown, your recording will begin automatically.

Step 3: Stop Recording
Once you're finished with your recording, here's how to stop it:
- Tap the red status bar at the top of your screen.This indicates that the screen recording is active.
- Tap "Stop" in the confirmation dialog that pops up.
- Your recording will automatically save to the Photos app. You can access and edit it from there.
Finding Your Screen Recordings
After recording your screen, you can easily access your videos:
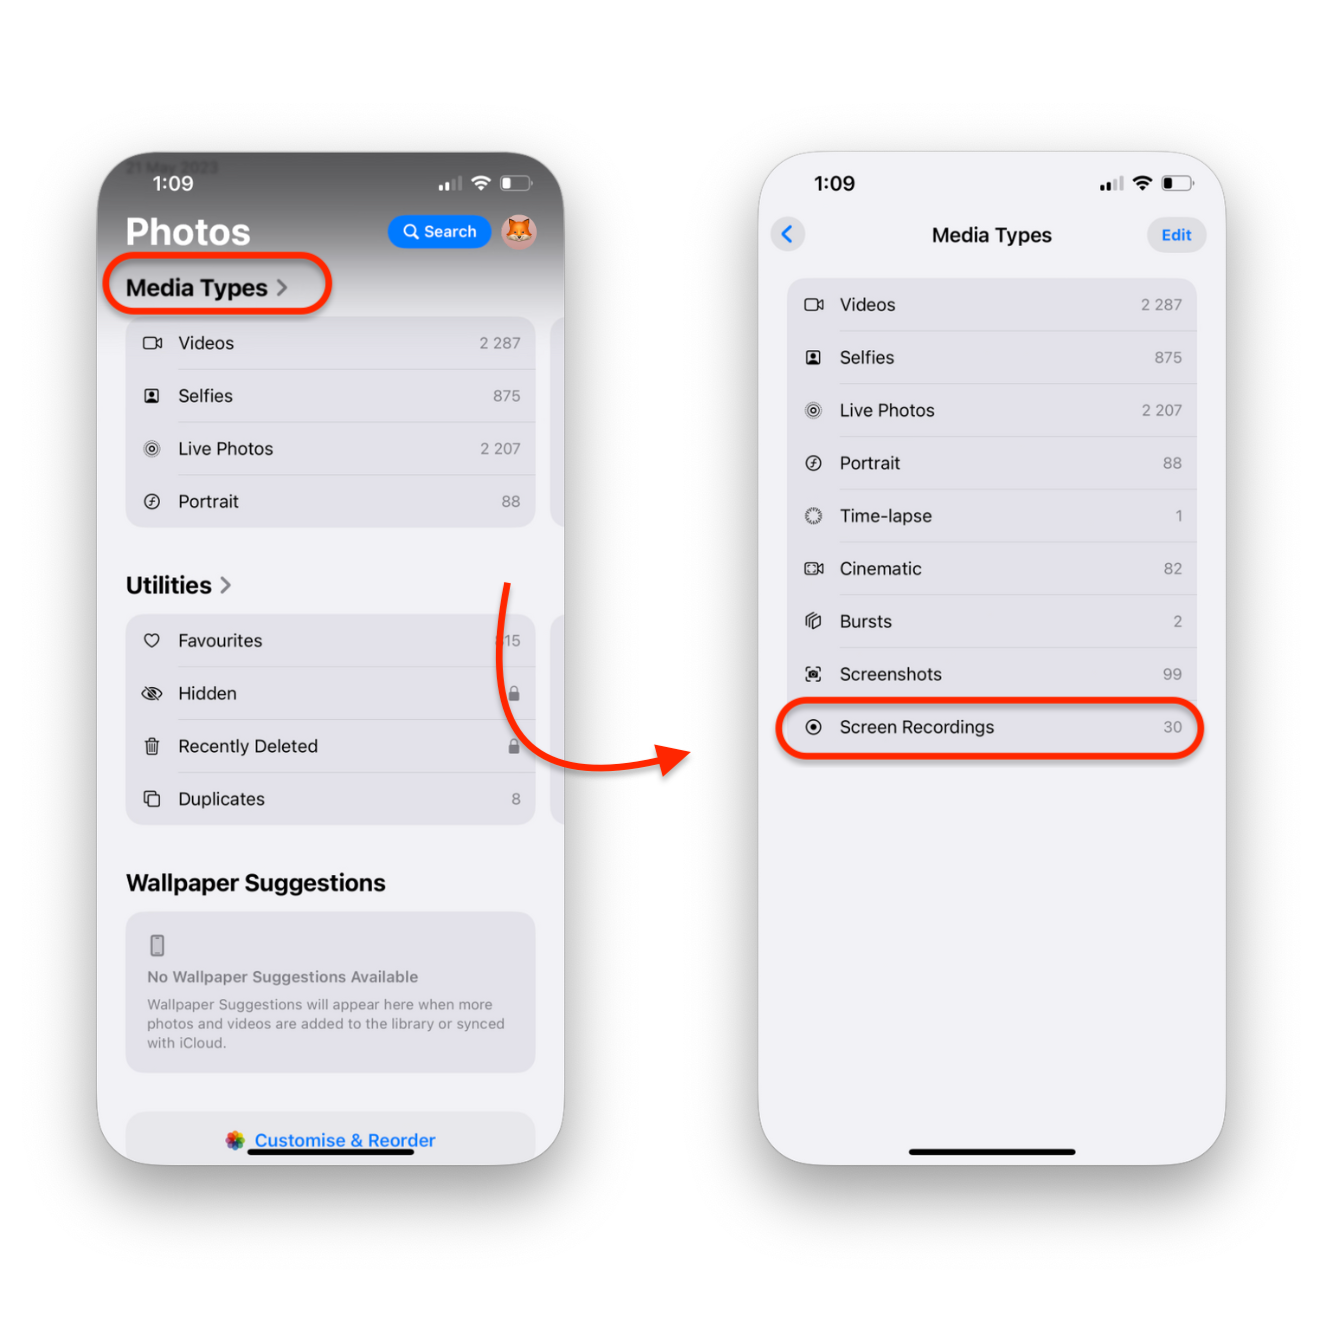
- Open the Photos app
- Go to the Albums tab
- Scroll down to Media Types
- Tap Videos or Screen Recordings folder
- Your recordings appear in chronological order

You can also find them in the Recents album mixed with your other photos and videos.
Tips for Better Screen Recordings
Make your screen recordings more professional and useful:
Clean up your home screen before recording to remove distractions
Turn on Do Not Disturb to prevent notifications from interrupting
Plan your actions before starting the recording
Record in good lighting if showing your face with a Picture-in-Picture view
Keep recordings short (under 3 minutes) for easier sharing
Include audio narration by long-pressing the screen recording button in Control Center and turning on the microphone
Edit your recording in the Photos app to trim unnecessary sections
Troubleshooting Common Issues
Issue | Solution |
|---|---|
Recording won’t start | Try restarting your iPhone. This can resolve temporary glitches and refresh your device’s memory, allowing screen recording to work properly. |
Silent recording | Ensure you’ve enabled the microphone. By default, audio isn’t recorded. Long-press the screen recording button in Control Center and tap the microphone icon to activate it. |
Recording stops unexpectedly | This often happens due to insufficient storage. Check your available space in Settings, and free up space by deleting unnecessary files or offloading apps you rarely use. |
Missing recordings | If your recording is nowhere to be found, check the Recently Deleted album in Photos. Also, make sure you're looking in the correct album—screen recordings can sometimes be filed under Videos instead of a separate Screen Recordings folder. |
No red indicator | If the red recording icon doesn’t show at the top of your screen, close all background apps and restart Control Center. In stubborn cases, toggle Airplane Mode on and off to reset connections. |
Options for Older iPhones Without Screen Recording
If your device doesn't support built-in screen recording, try these alternatives:
- Use a computer connection: Connect your iPhone or iPad to a computer and use QuickTime Player on Mac or other recording software on Windows. Alternatively, you can use an iPhone backup extractor like AltTunes to back up important screen recordings and data to keep your memories safe.
- Try third-party apps: Some apps available on the App Store can assist with screen recording and allow you to save important videos directly. Tools like AltTunes also help manage your screen recordings, contacts, and other files for safe storage.
- Back up recordings: Use AltTunes to backup iPhone content including screen recordings
- Manage your data: AltTunes lets you export contacts from iPhone and view iCloud backup files directly. For more comprehensive data management, AltTunes also allows you to sync iPhone with PC, making sure no content is lost during transfers.
Conclusion
Screen recording on your iPhone or iPad can be a powerful tool for many purposes. With built-in features for newer devices and backup options on old iPhones, you can easily capture and save any part of your screen. Whether you’re making tutorials, capturing memories, or sharing gameplay, screen recording provides an easy way to document and save your content.
FAQ
How can I efficiently manage my screen recordings?
Managing multiple screen recordings is seamless with Softorino’s AltTunes. This powerful tool allows you to organize, categorize, and access your recordings effortlessly. With AltTunes, you can ensure all your captured videos are neatly stored and easily retrievable on your Mac or iOS devices.
What should I do if my device doesn't support built-in screen recording?
If your iPhone or iPad doesn't support native screen recording, Softorino’s AltTunes offers an excellent alternative. AltTunes enables you to capture and transfer screen recordings from your device to your Mac, ensuring you can still save and manage your important videos without needing the latest hardware.
How can I transfer screen recordings between my Mac and iOS devices easily?
Transferring screen recordings is simple with Softorino’s AltTunes. The app provides a straightforward interface to seamlessly move your recordings between your Mac and iPhone or iPad. This ensures that your videos are always accessible on all your Apple devices without any complicated steps.
Where are my screen recordings saved, and how can I access them quickly?
Screen recordings are automatically saved in the Photos app on your iOS devices. To access and manage them more efficiently, Softorino’s AltTunes allows you to synchronize these recordings with your Mac. This makes organizing and viewing your screen recordings across all your devices quick and easy.
Can I enhance my screen recording workflow for tutorials and presentations?
Absolutely! Softorino’s AltTunes enhances your screen recording workflow by providing tools to edit, organize, and share your recordings effortlessly. Whether you're creating tutorials, saving memories, or preparing presentations, AltTunes ensures your screen recordings are polished and professionally managed.

