How to Quickly Move Photos to iСloud in 2025

Storing your photos and videos in iCloud ensures they are accessible across all your Apple devices. Whether using an iPhone, iPad, Mac, or even a Windows PC, you can easily upload photos to iCloud and free up valuable storage space on your devices.
This guide will teach you everything you need to know about moving photos to iCloud in minutes.
Why Move Photos to iCloud?
Whenever you upload photos to iCloud, they become part of the iCloud photo library and can be accessed across all of your iOS devices. People mainly upload their photos to iCloud to create a reliable backup. But it's also good to know how to create a secure local backup without iCloud.
Before diving into the steps, let's look at benefits of transferring photos to iCloud:
Access Anywhere – Your photos and videos are automatically uploaded to iCloud, making them accessible on all your devices.
Save Storage Space – Enabling iCloud Photos helps optimize iPhone storage by storing full-resolution images in the cloud and keeping lower-resolution versions on your device.
Automatic Backup – iCloud works by syncing new photos and videos automatically, ensuring you never lose a precious memory.
Easy Sharing – Easily share albums and specific photos with friends and family.
By the way, if you struggle to move your photos from the iPhone to a Windows computer, take a look at AltTunes. AltTunes makes transferring photos from iPhone to PC a simple and quick task, as well as exporting other types of media and creating local backups.
Now, let's go step by step to upload your photos to iCloud from different devices.
How to Move Photos to iCloud from iPhone or iPad
Step 1: Enable iCloud Photos
- Open Settings on your iPhone or iPad.
- Tap [Your Name] > iCloud > Photos.
- Toggle on iCloud Photos.
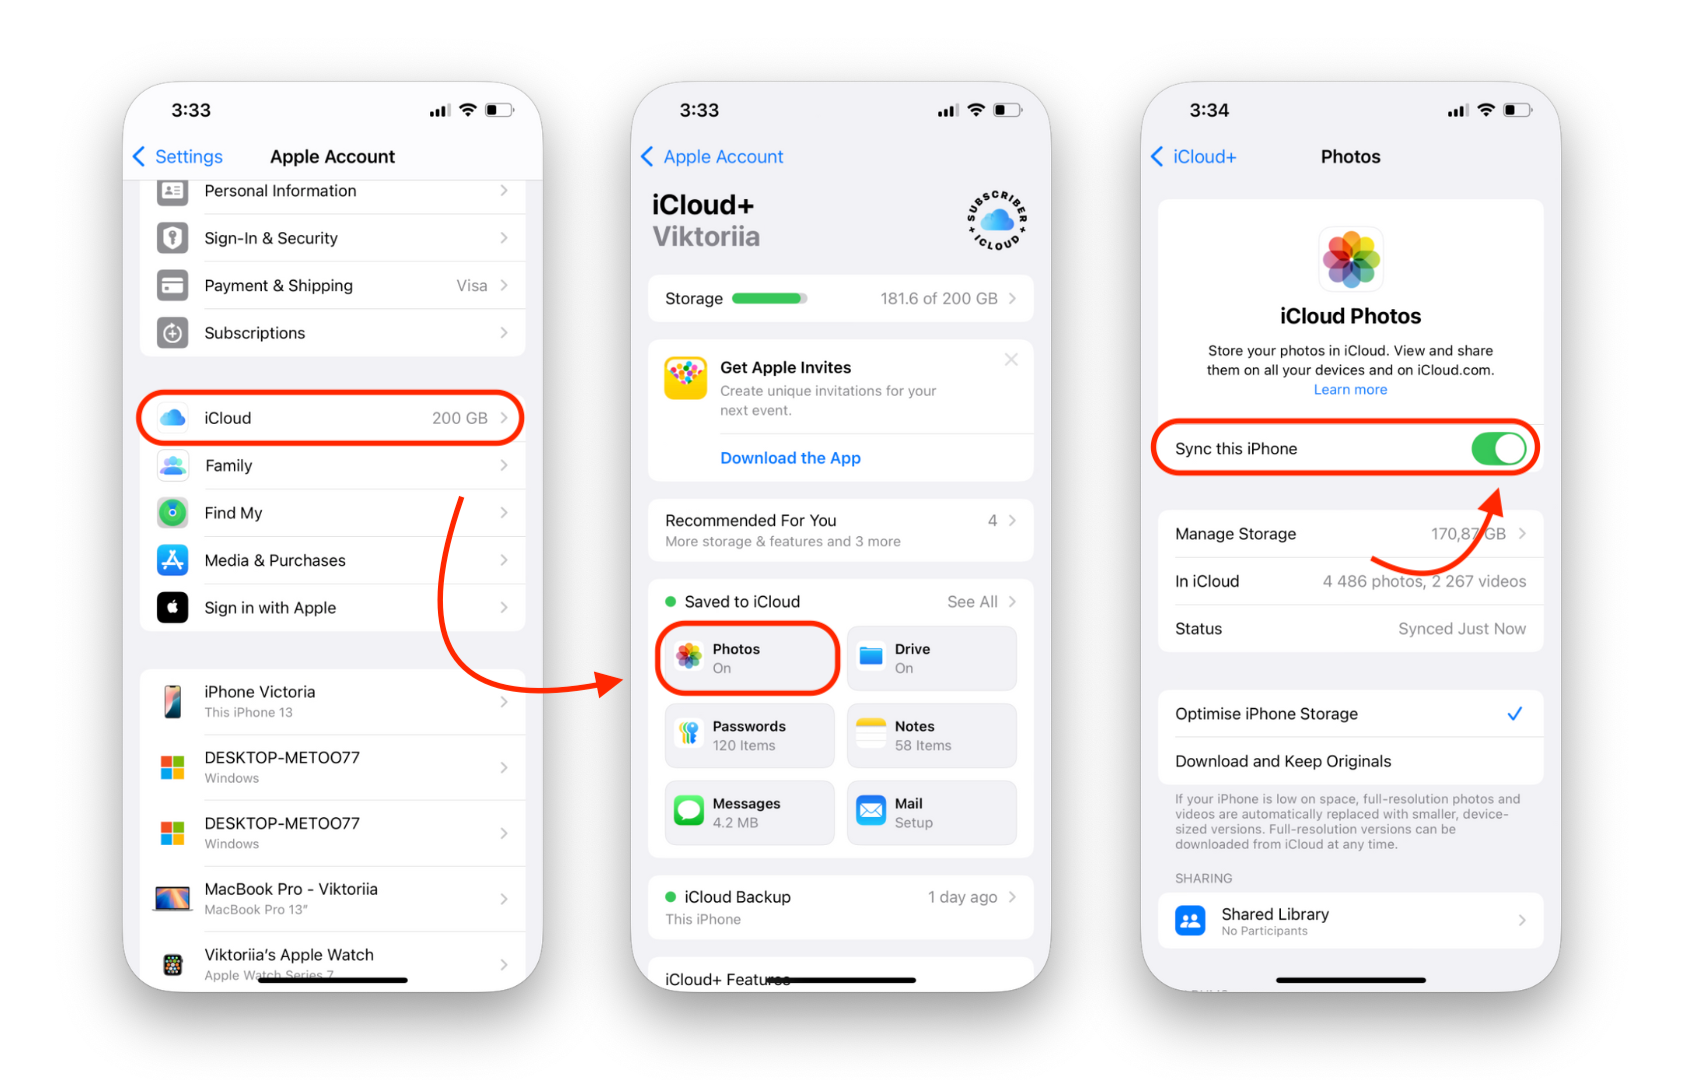
This setting ensures your photos and videos are automatically uploaded to iCloud and synced across your devices.
Step 2: Optimize iPhone Storage (Optional)
- Optimize iPhone Storage: By enabling Optimize iPhone Storage, your iCloud photos will be saved to your Camera Roll in low-resolution optimized versions, while their full-resolution versions will be stored in iCloud, which you can access with an active internet connection.
- Download and Keep Originals: This option can download and keep originals from iCloud (both photos and videos) in full resolution to your Camera Roll so you can enjoy high-quality photos anytime on your Apple device. Choose this option if you have enough storage to contain full-resolution iCloud photos.
Step 3: Sync the Photos
Uploading photos requires an internet connection. Use Wi-Fi instead of cellular data to avoid additional charges. Once connected, tap 'Sync Now' in the iCloud Photos menu to immediately initiate the process.
How to Move Specific Photos to iCloud
This is a universal choice that can help you move any photo to your iCloud library from any computer with an internet connection. It can also upload a specific photo there without syncing everything from the device.
- Visit iCloud.com and sign in.
- Navigate to Photos and click the Upload button in the top right corner.
- Select the images you want to upload and confirm the action.
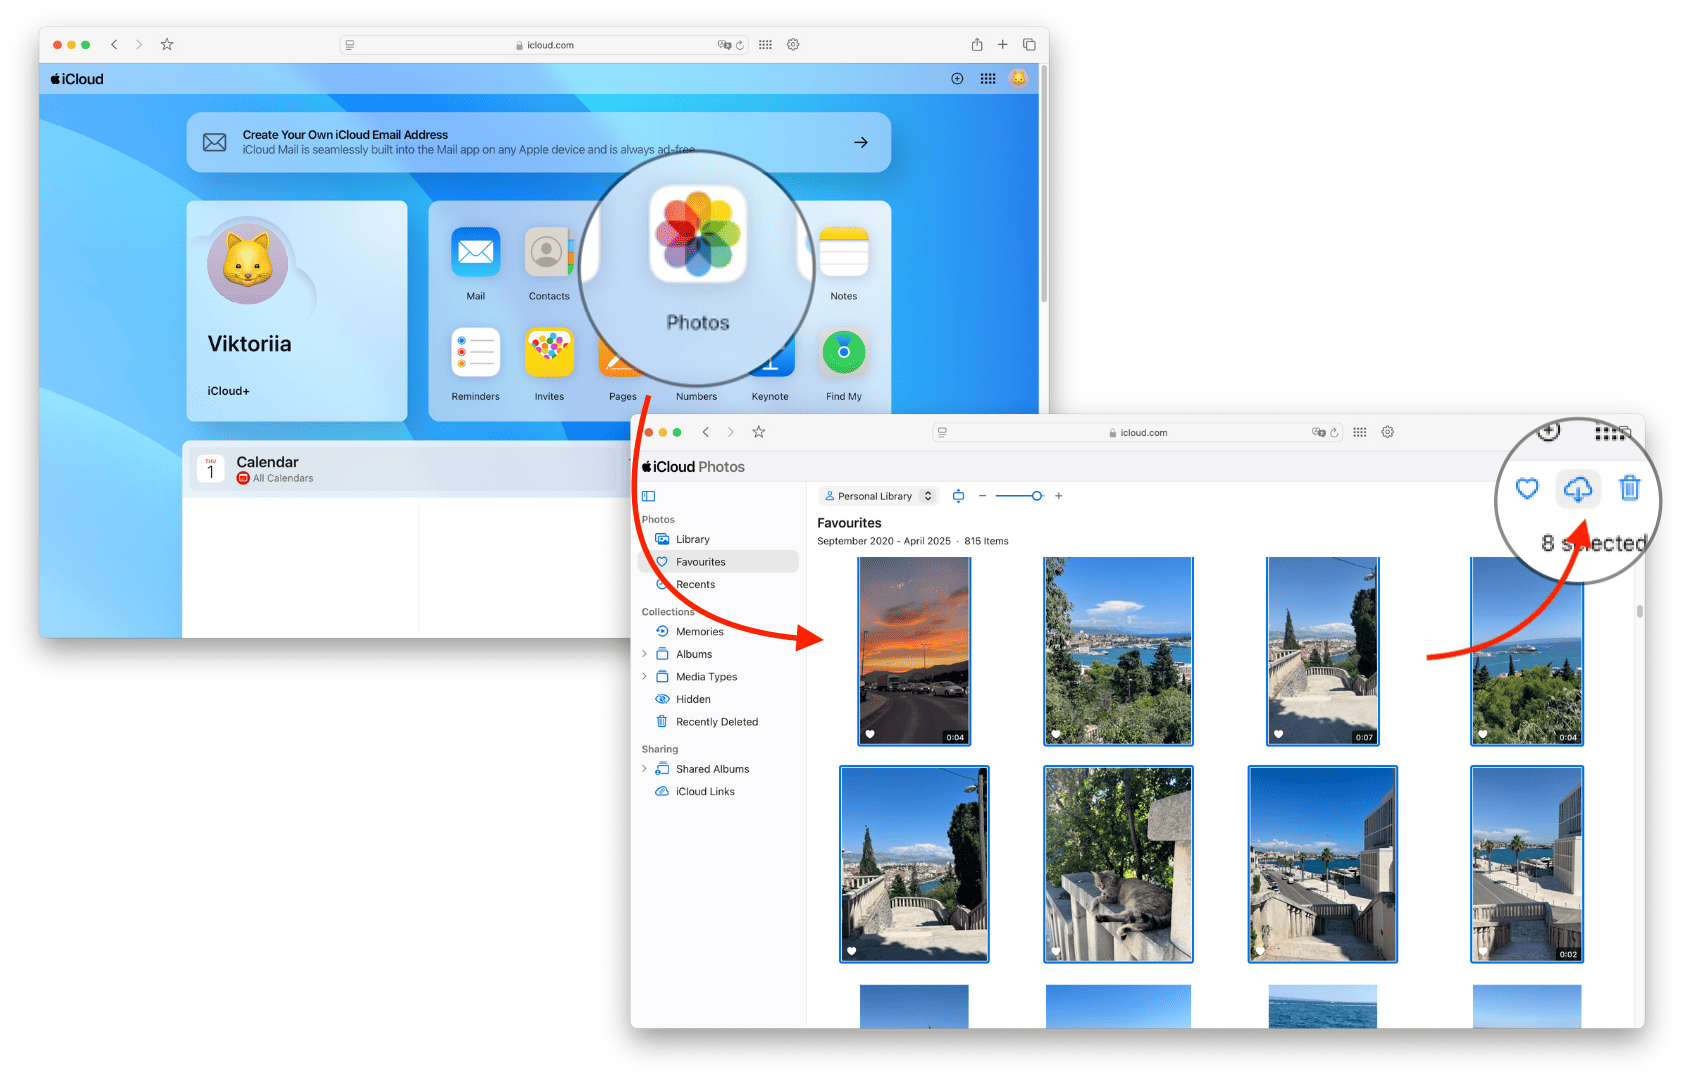
That's how simple it is to upload photos from a computer to iCloud and access them anytime. You can do the same from all Apple devices, including the iPhone and iPad. If it has a browser and internet connection, it's suitable for this method.
How to Upload Photos to iCloud from a Mac
- Open the Photos app.
- Click Photos > Preferences > iCloud.
- Check iCloud Photos to start syncing.
- Choose between Download and Keep Originals or Optimize Mac Storage.
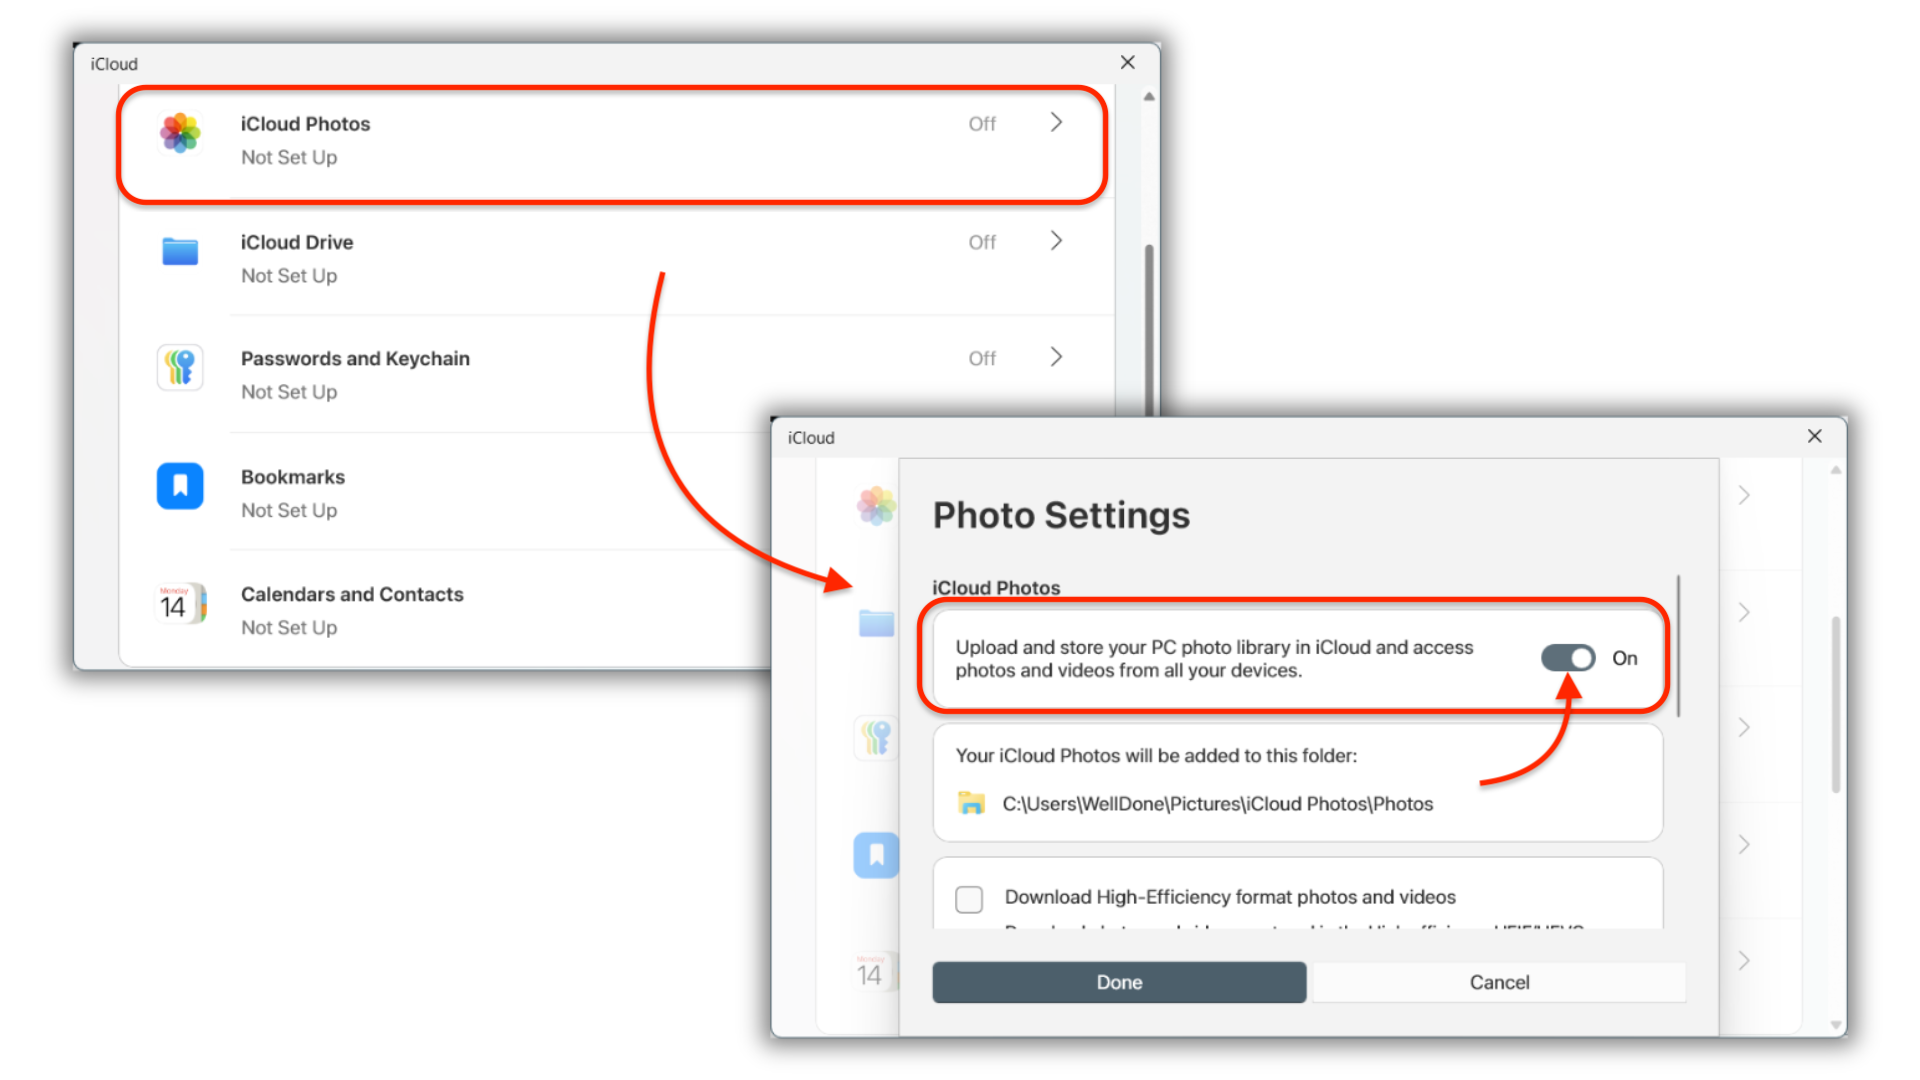
Upload Photos to iCloud from Windows
You can upload photos to iCloud even on a Windows PC:
- Download and install iCloud for Windows from the Microsoft Store.
- Sign in with your Apple ID.
- Enable iCloud Photos.
- Drag and drop photos into the iCloud Photos folder in File Explorer.
That's All Folks!
Now that you know how to upload photos to iCloud and back them up, try these methods and let us know which one works best for you! Explore more topics like, what happens when you delete iCloud backup or how to secure your data with iPhone encryption for extra protection.
FAQ
How do I upload photos to iCloud from my iPhone?
To upload photos to iCloud from your iPhone, go to Settings, tap on your name, and then select iCloud. Navigate to Photos and toggle on iCloud Photos. This will allow your photos to be automatically uploaded to iCloud and accessible across all your devices.
Can I upload photos to iCloud from a Windows PC?
Yes, you can upload photos to iCloud from a Windows PC. Install the iCloud for Windows app, sign in using your Apple ID, and select the Photos option in iCloud settings. Then, drag and drop your photos into the iCloud Photos folder in File Explorer to upload them.
How can I back up my iPhone photos without iCloud?
To back up iPhone photos without iCloud, you can use apps like AltTunes. After installing AltTunes on your computer, connect your iPhone via USB, select the photos you want to export, and transfer them to your computer. This method allows you to store photos without using cloud storage.
Why aren’t my iCloud photos showing on other devices?
If your iCloud photos aren’t showing on other devices, make sure iCloud Photos is enabled on each device. Go to Settings, tap your name, then iCloud, and ensure that iCloud Photos is toggled on. All devices should be signed in with the same Apple ID and connected to Wi-Fi.
Where are iTunes backup photos stored on my computer?
iTunes backups, including photos, are stored in a backup folder on your computer, but they are not viewable directly. You need to restore the backup to an Apple device to access these photos. Alternatively, you can use third-party apps like AltTunes to view and export photos from iTunes backups.

