How to Quickly Set Custom Ringtones on FaceTime using iRingg


Many iPhone users prefer the FaceTime app over traditional phone calls, but most stick with the default ringtone. Setting a custom FaceTime ringtone personalizes your calls and makes them instantly recognizable.
This guide will show you how to customize your ringtones on both iPhone and Mac using iRingg, an intuitive app that makes setting a ringtone on your iPhone without iTunes or GarageBand a breeze.
💡 Apple makes custom ringtones unnecessarily complicated. Why should something as simple as adding a song as a ringtone require third-party software or jumping through iTunes hoops? iRingg exists because Apple's native process is frustrating.
Why Customize Your FaceTime Ringtone?
A custom FaceTime ringtone makes your device unique and calls more recognizable. Just like you might set up a custom ringtone for iPhone, you can add sound effects, voiceovers, or clips from your favorite songs. iRingg's SndMoji feature lets you add fun elements like explosion sounds, animal noises, or your own voice recordings.
The result? A ringtone nobody else has that reflects your personality. When you start receiving calls with your custom sound, you'll see how much more personal the experience becomes.
What You Need: iRingg
You'll need iRingg for Windows—a user-friendly application that creates custom iPhone ringtones without iTunes complications. If you haven’t installed it already – now is the perfect timing.
Apple doesn't provide a simple native way to create custom ringtones. While you can technically use GarageBand or iTunes, both methods are time-consuming and unintuitive compared to dedicated software like iRingg.
Close iTunes completely before using iRingg to avoid conflicts. iTunes running in the background can interfere with ringtone transfers and slow down your system unnecessarily.
Key iRingg Features:
6-Sense technology: Automatically suggests songs from your music library
SndMoji: Add sound effects to your ringtones
Audio editing: Trim songs and add fade effects
Voice recording: Include personal voiceovers or other audio
For music management beyond ringtones, check out our guides on how to transfer music from your computer to your iPhone without using iTunes and how to move tracks from SoundCloud to Apple Music.
When you start using this application, you'll find it much more intuitive than Apple's original approach. To start customizing your iPhone, follow these 4 quick steps:
Step-by-Step Guide: iPhone FaceTime Ringtones
Step 1: Connect Your iPhone

Launch iRingg and connect your iPhone via USB cable. After the initial setup, you can transfer ringtones wirelessly when both devices share the same Wi-Fi network.
The first connection requires a USB cable for device recognition. This is a security requirement—third-party apps need physical connection before wireless transfers work.
⚡ After the initial USB setup, use Wi-Fi transfers to save your USB ports and reduce cable wear. Keep both devices on the same network for fastest transfer speeds.
Step 2: Choose Your Audio
Search for a song or let 6-Sense recommend one. iRingg pulls from sources like YouTube, making it easy to convert YouTube to ringtone. Want to try using Britney Spears' "Toxic"? Go for it.
You can also use an audio file from your computer—the app supports various audio formats, so you may find it accepts almost any music file you have.
If you’d rather save tracks for listening, check our tutorial on how to convert YouTube to Apple Music.
Step 3: Customize Your Sound
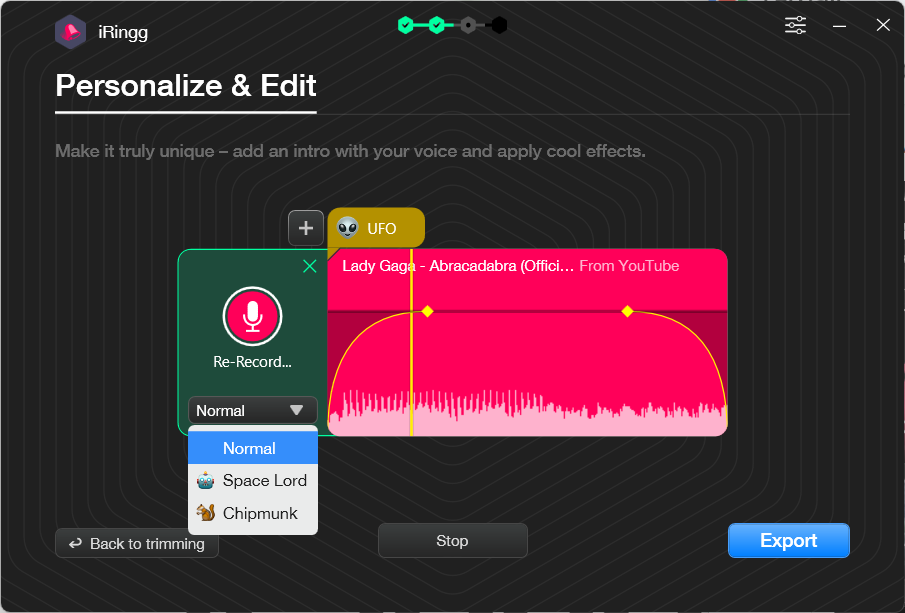
This is where creativity kicks in. Trim your audio to the perfect length, adjust volume levels, and add fade-in or fade-out effects for smooth transitions.

Next, pick a Sound Emoji—maybe an explosion or cat meow (which actually pairs well with the opening of "Toxic"). Add a personal voice intro for a truly unique touch. Try singing along with your chosen song if you want—this creates a great personalized version that's impossible to copy.
You can even convert MP3 to M4R for smooth playback on iPhone if you're working with different audio formats.
Step 4: Export and Apply
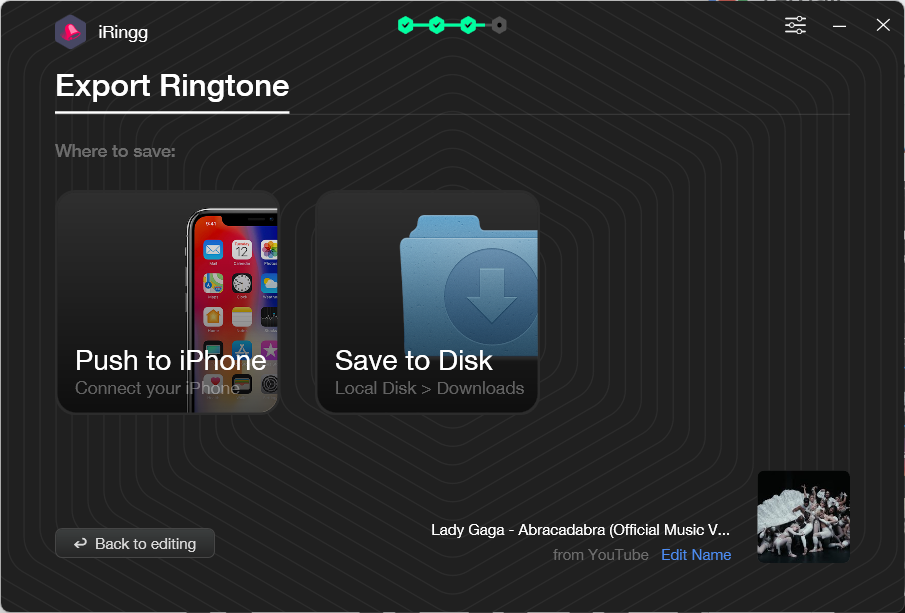
Transfer your finished ringtone to your iPhone or save it to your computer.

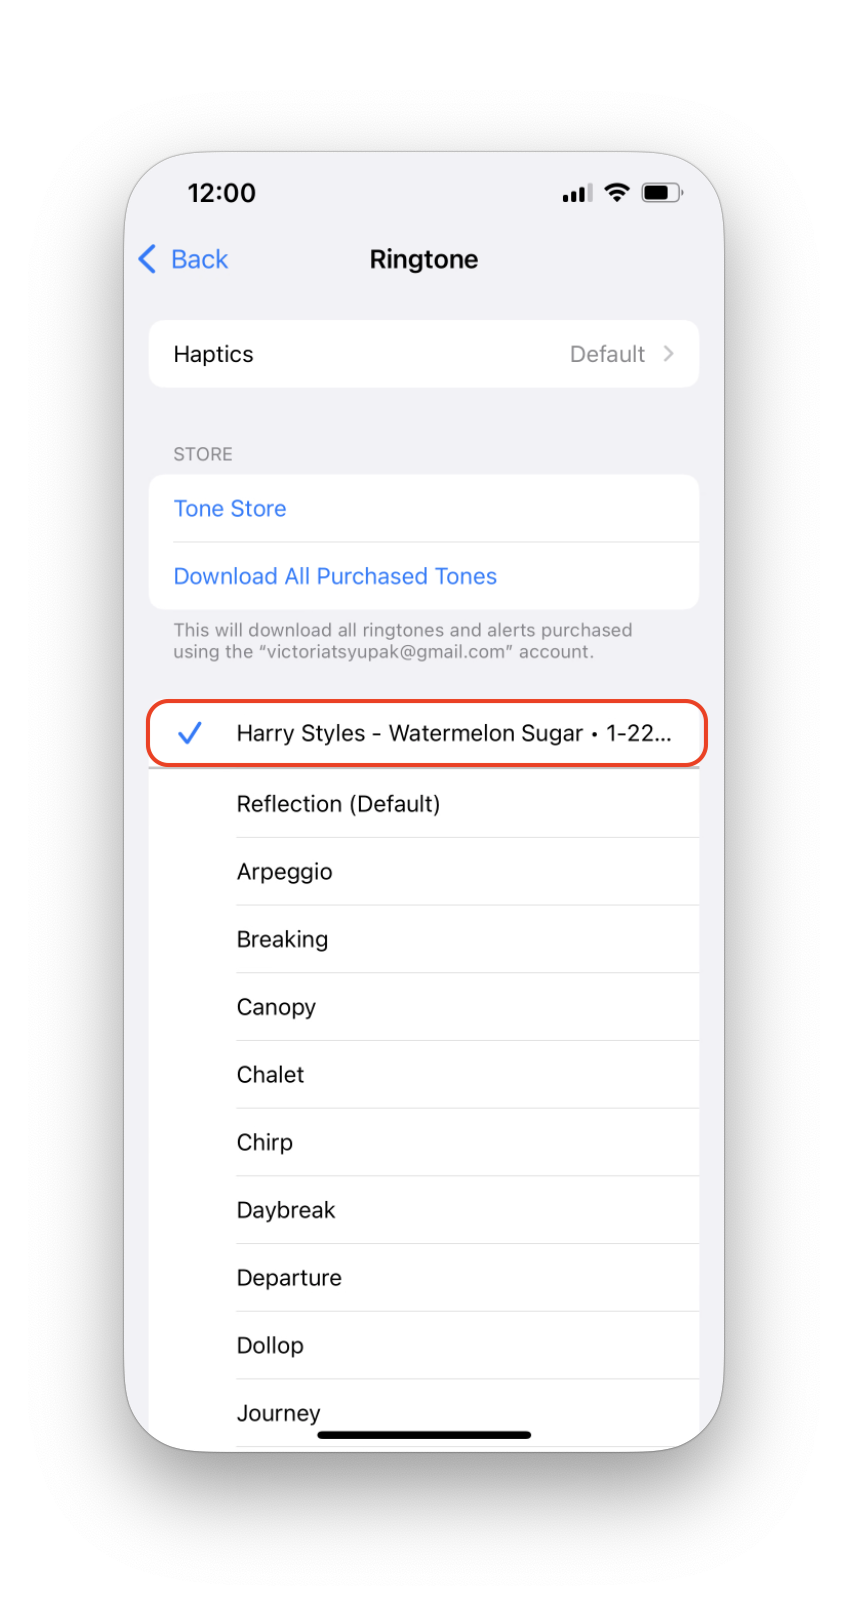
On your iPhone, go to Settings > Sounds & Haptics > Ringtone. Your custom ringtones appear above the default options. Select your creation and you're done.

Setting Mac FaceTime Ringtones
Your iPhone ringtone change won't affect your Mac's FaceTime app sound—you'll need to set that separately. After creating your ringtone in iRingg, export the file to your Mac's hard drive.
💡 This separation between iPhone and Mac ringtones feels deliberately obtuse. In an ecosystem that prides itself on continuity, why don't ringtone changes sync across devices? It's another small friction that shouldn't exist.
Then follow these steps:
- Open the FaceTime app on your Mac
- Click FaceTime > Preferences in the menu bar
- Click the Ringtones dropdown
- Select your custom ringtone
You can also right-click on the ringtone file and select "Open With" to enter it directly into your system's sound library. This saves time when you have multiple custom files to add.
⚡ Store your custom ringtones in a dedicated folder on your Mac. This prevents accidental deletion and makes it easier to reapply them after system updates or when setting up new devices.
Managing Your Ringtones
iRingg works for more than FaceTime tones. You can add ringtones to iPhone and switch between them easily. When your collection gets too large, here's how to delete ringtones on iPhone to free up space.
⚡ Regularly clean out unused ringtones to free up storage space. Each custom ringtone takes up several megabytes, and they can accumulate quickly if you're experimenting with different sounds.
Deleting ringtones from your iPhone doesn't automatically remove them from your Mac. You'll need to manage each device's ringtone collection separately.
Final Thoughts
Custom FaceTime ringtones add personality to your calls and make them instantly recognizable. With iRingg, the process takes minutes instead of the complex iTunes workarounds of the past.
What best represents you – a favorite song, a funny sound effect, or a personal recording as your ringtone? The choice is yours, and by the end of this process, you’ll have something truly unique. For even more methods, check out our detailed guide on how to turn YouTube videos into iPhone ringtones.
FAQ
Why should I customize my FaceTime ringtone?
Customizing your FaceTime ringtone makes your calls more personal and easily recognizable. With the iRing app by Softorino, you can effortlessly create unique ringtones that match your style, enhancing your overall FaceTime experience and making each call feel special.
Can I use my favorite music as a FaceTime ringtone?
Yes, you can! The iRing app by Softorino allows you to incorporate your favorite songs into custom FaceTime ringtones. Its intuitive editing tools let you trim tracks and add effects, ensuring your ringtone perfectly reflects your musical preferences every time you receive a call.
Is it possible to have different ringtones for FaceTime on my Mac and iPhone?
Absolutely. Using the iRing app from Softorino, you can easily set distinct ringtones for FaceTime on both your Mac and iPhone. This flexibility ensures that each device has a unique sound, helping you identify which device is receiving the call instantly.
What customization options are available for creating ringtones?
The iRing app by Softorino offers a variety of customization features, including song trimming, fade-in/out effects, and adding sound effects or voiceovers. These tools enable you to design ringtones that are uniquely yours, tailored to your specific preferences for both FaceTime and regular calls.
How do I transfer custom ringtones to my devices?
Transferring custom ringtones is simple with the iRing app from Softorino. Whether you prefer using a USB connection or Wi-Fi, the app provides a seamless transfer process, allowing you to quickly set your personalized ringtones on both your iPhone and Mac without any hassle.


